Categories
Backups Docker Linux Windows

Urbackup – Open Source Network Backup

I know this is a little late for world backup day, but backups are needed everyday!

Today we will be talking about Urbackup. It is a Open Source network backup solution that you can use in your home or office network. I cannot express to you all the importance of a good backup solution. Working in the IT field as a consultant and MSP provider for many years I have seen my share of Clients who neglected their backups. Let me tell you, recovering from a failure without a good backup is not cheap. Remember it the question is not IF a failure will occur it is WHEN it will occur.

What is UrBackup?

Urbackup is a Web based backup solution that can backup Windows, Linux, FreeBSD and Mac (in beta) Operating systems. You can install Urbackup Server on both Linux or Windows.

There are two types of agents that you can install, Local or Internet. Internet Agents allow your computers to be backed up over the internet, however it is slower and requires a lot more configurations and infrastructure. For the purpose of this article we will focus on local.

How does Urbackup Work?

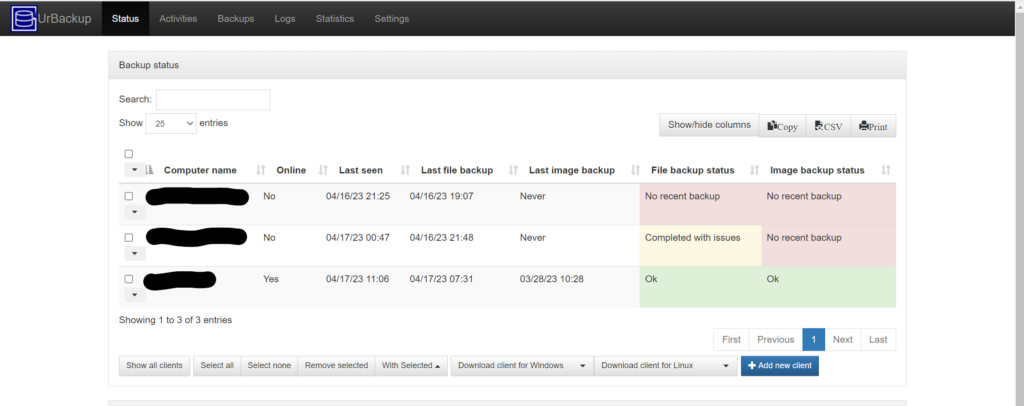
As you can see from the above screen shot the interface is pretty easy to read. Each computer that you have an agent on will be listed in the dashboard and the status columns are color coded to let you know how your backups are looking.

Installed Local agents will allow your machine to connect to 1 (you can do more, but it requires addtional configuration) Urbackup server. Urbackup will automatically perform file and image based backups (Image based is for Windows Only).

Imaged based restores can be intitated by either converting the image to a .vhd and mounting the image to a Windows computer or as a virtual machine such as Hyper-V. You can also use the bootable recovery disk to restore your image to your hardware in the event of a hardware failure.

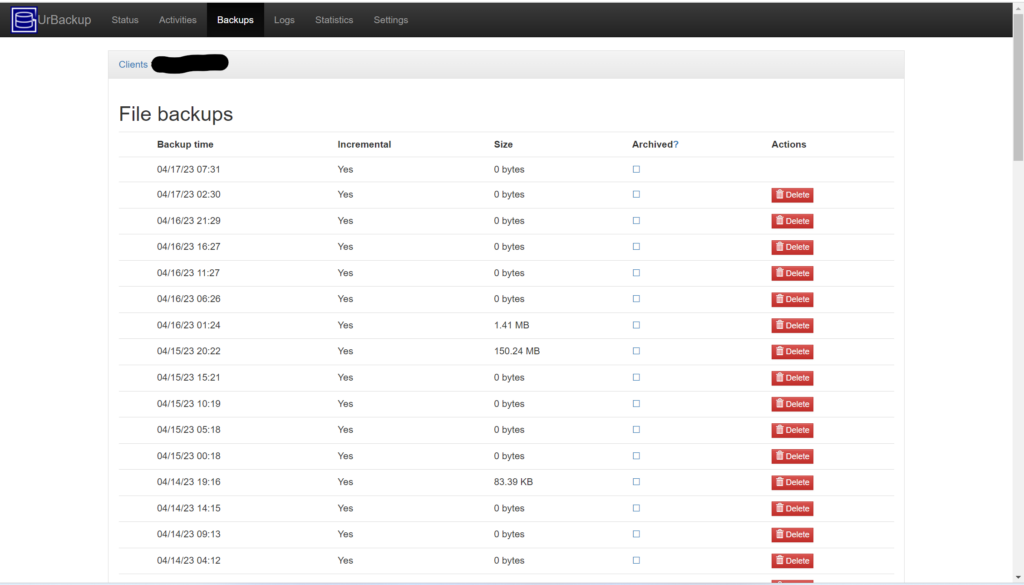
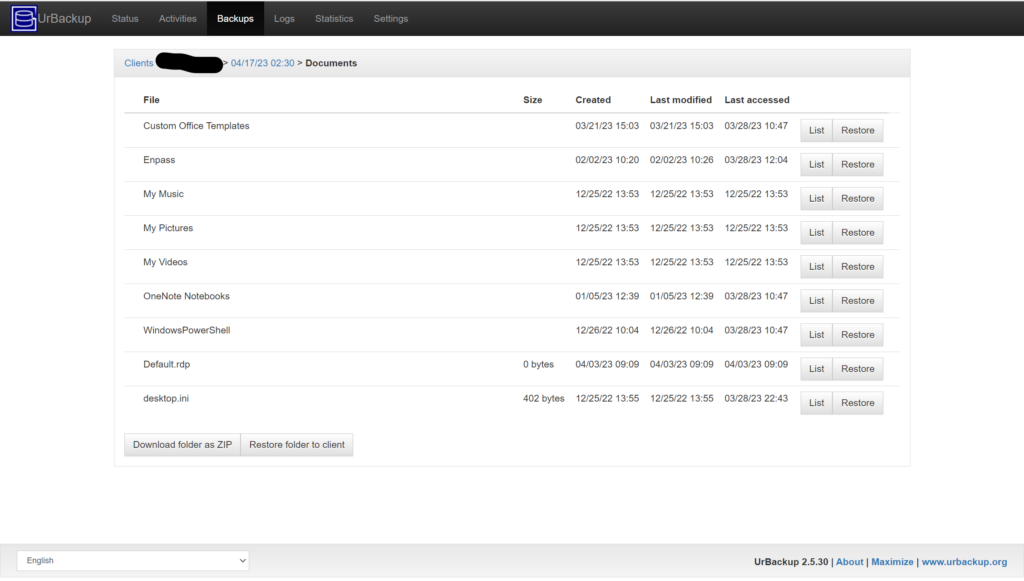
Urbackup also allows you to view the backups that have been taken and drill down into them to restore individual files as seen below.

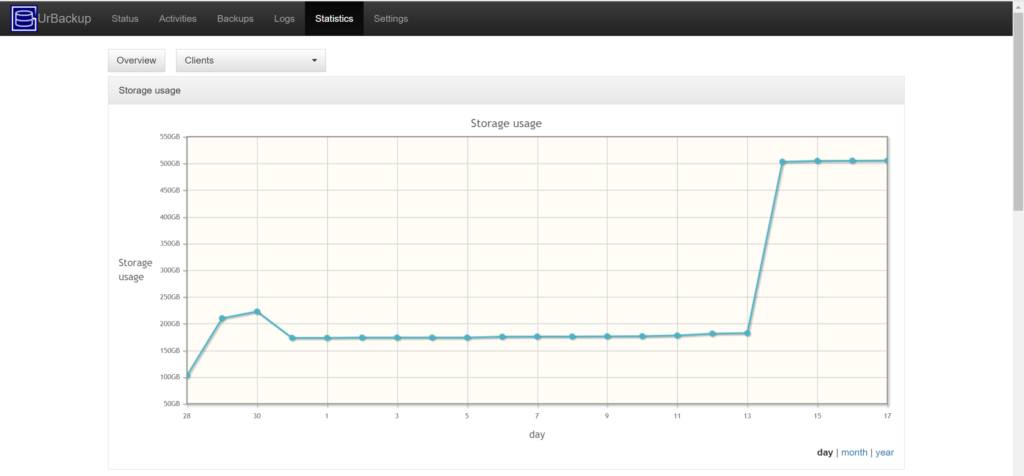
Reports and Statistics are also available and will show you how much space you are using without having to log into the actual server.

How can I get Urbackup?

As I mentioned earlier Urbackup is able to be installed on Linux and Windows. It is also able to be installed in a container such as Docker and there are many NAS appliances such as Synology which you can run the container on and provide storage.

Closing

I hope you found this article helpful and if you would like to learn more about it please feel free to reach out. Also if you want to learn about a different backup solution, check out this post on Duplicati.

Please share this out ot your friends as it could helpful to others.

Categories
Microsoft Tools Uncategorized

Need help resizing your Hard drive?! AOMEI Partition Assistant to the rescue.

I was asked to assist with a SSD replacement for a drive that was starting to degrade. I started off by using CloneZilla to backup the drive but de to the degradation of the 90 GB SSD I was not able to complete the backup to my drive. In order to get around this issue I was able to use the Windows backup utility to create a disk image (which for some reason worked) an then restore the image to a new 1 TB drive.

At that point I thought I was made in the shade. Until I realized that I was not able to expand the C:\ Partition as there was another partition at the end of the disk. Windows Disk Manager would not allow me to move partitions (thanks Microsoft!) so I had to look for a third party solution to help. I came across AOMEI Partition Assistant Standard which said it would do the trick.

For the purpose of this exercise I went with the freeware download as I was only going to need to do this once and the Freeware edition should have been able to do what I needed. Let me tell you, I was not disappointed.

I installed it on the computer and from there I was able to not only move the partition on the disk, but I was able to expand the C:\ from 90 GB to 990 GB all at the same time. After submitting the job, it asks for a reboot which took a while but once the computer came back up it was working great!.

If you are ever in this situation you should totally check these guys out as they are now going to be a staple in my tool kit for the foreseeable future.

Categories
Exchange Microsoft Office 365 PowerShell

Enable a Remote Mailbox in Office 365

So I recently ran into an issue where I had a user who’s Local AD account had been deleted but their Office 365 Mailbox was still showing up. We tried to bring the user account back, however the AD recycle bin was not enabled. So we had to create a brand new account for the user and then work from there.

We originally planned to create a new mailbox and let the user start from scratch. However we ran into an issue were the old mailbox would not go away, and it was preventing us from migrating a new mailbox into Exchange Online for the user.

I then found the following Exchange Management Shell command which will allow you to connect the local AD account to the Exchange Online Mailbox.

Enable-RemoteMailbox USERNAME -RemoteRoutingAddress [email protected]

After running the command the user is now able to log in with their new AD account and have access to their mailbox.

I hope you found this post helpful, and if you did, please share it with your friends.

Categories
Active Directory Microsoft Windows

Microsoft Active Directory Time Sync Settings

So I was recently asked by a client: “Why is the time on my PC 5 minutes off from my phone?”

Now this is a small environment, a very small environment (1 Server and 7 workstations). The first thing I thought about was what does the server clock look like? So I remoted into the server and sure enough it had the same time as the workstation.

I went and checked the registry and found that the server was pointed get its time from time.windows.com, but for some reason that was not working.

I then used the following command to point it to several of the pools hosted by NIST.gov

w32tm /config /manualpeerlist:time-a-g.nist.gov,time-b-g.nist.gov,time-c-g.nist.gov,time-d-g.nist.gov /syncfromflags:manual /reliable:yes /update

After that I restarted the W32Time (Windows Time) service to make the update work.

Once that is done it should force a resync of the time service which could take some time to update and to sync with all the workstations.

I hope you find this post helpful, and if so please share it with your friends.

Categories
Exchange Microsoft Office 365 PowerShell

How to convert a User Mailbox to a Shared Mailbox in Exchange 2016

So I discovered that there is the right way and the wrong way to create a Shared Mailbox when using Office 365 Exchange Hosted and Exchange 2016 in a Hybrid configuration. So the way I would normally do it would be to migrate the mailbox to Office 365 and then click that pretty little button to convert to a Shared Mailbox.

It turns out that when you do that it will create the mailbox as a shared mailbox, however the Active Directory (AD) Components are non-existent. Which means you cannot assign permissions to users who are synced by AD.

Well…. you can…. but it doesn’t actually work.

So what can we do to make it work when you have a user who is complaining that they need to send out a file at 4:45 PM on a Friday???

Well there is not much that you can do, but I would start with converting the mailbox back to a normal user mailbox and then migrate the mailbox back to your Local Exchange Environment.

Once the migration is complete you can then run the following command to convert a normal user account to a Shared Mailbox on Exchange.

Set-Mailbox AJones -Type shared

Once the command is complete (which is really freaky fast) you will then be able to see the mailbox under the “Shared Mailbox” section in Exchange.

I would then Migrate the mailbox back to Office 365 the way that it is and once it is done you should be good to go.

In the event that you would want to switch the Shared Mailbox back to a normal mailbox, here is the command to switch it back.

Set-Mailbox AJones -Type regular

I hope you found this guide helpful, and if did, please share it with your friends.

Categories
Azure Microsoft Windows

Azure VPN Client not working on Windows 7 and Windows 8.1

I was working on an issue with a client who was not able to connect to an Azure VPN. He was getting the following error message:

The connection was prevented because of a policy configured on your RAS/VPN server. Specifically, the authentication method used by the server to verify your username and password may not match the authentication method configured in your connection profile. Please contact the Administrator of the RAS server and notify them of this error. (Error 812) For customized troubleshooting information for this connection, click Help.

After doing some extensive research, I found out that TLS 1.2 needs to be enabled on the workstation for it be able to connect.

In order to fix this issue, you will need to add the following registry keys:

reg add HKLMSYSTEMCurrentControlSetServicesRasManPPPEAP13 /v TlsVersion /t REG_DWORD /d 0xfc0

reg add “HKLMSOFTWAREMicrosoftWindowsCurrentVersionInternet SettingsWinHttp” /v DefaultSecureProtocols /t REG_DWORD /d 0xaa0 if %PROCESSOR_ARCHITECTURE% EQU AMD64

reg add “HKLMSOFTWAREWow6432NodeMicrosoftWindowsCurrentVersionInternet SettingsWinHttp” /v DefaultSecureProtocols /t REG_DWORD /d 0xaa0

You will also need to install the following patches:

Then you will need to reboot the PC and you should be able to connect to the VPN.

Categories
Exchange Microsoft Office 365 PowerShell Windows

How to connect to Exchange Online with PowerShell

I realized that my previous post might have been confusing about how to connect to Exchange Online. So I wanted to do a post on how you can connect to Exchange Online Using PowerShell.

First things first, because some of the scripts that you will need to run are not native to your machine, you will need to run this command, probably as an administrator before you can try to connect.

Set-ExecutionPolicy RemoteSigned

Next you will need to set your login credentials. This account needs to have administrative privileges in Exchange Online for it to Connect:

$UserCredential = Get-Credential

This will bring up a Office 365 login prompt. Enter your username, then your password and when it is done the screen will close and you will be back in PowerShell
$Session = New-PSSession -ConfigurationName Microsoft.Exchange -ConnectionUri https://outlook.office365.com/powershell-liveid/ -Credential $UserCredential -Authentication Basic -AllowRedirection
Lastly you will need to run this command

Import-PSSession $Session -DisableNameChecking

Which will enable several commands that are now available to you.
I hope that this guide helps you, I know that I always forget how to do this so doing a Blog post should help. 
Please feel free to share with your friends if you think it will help them. 
Categories
Exchange Microsoft Office 365 PowerShell Windows

Office 365 Hybrid – Shared Mailboxes Created in Exchange Online do not appear to users whose mailboxes exist on local Exchange

I have been working on an Hybrid Exchange Solution using Office 365. The Client has several shared mailboxes and I wanted to see if a Shared Mailbox created in Office 365 would appear for users who have not been migrated.

Long Story short, the answer is no, they cannot. The reason for this is actually pretty simple. Anything created in Office 365 is not assigned a GUID by Active Directory (because we are only doing a unidirectional sync) so Exchange does not have any record of it.

 It turns out however, that if you migrate the mailbox to the On Premise Exchange server a GUID can be assigned.

I found this Article on Microsoft’s support site on how to do it:
https://support.microsoft.com/en-us/help/3129334/users-in-a-hybrid-deployment-can-t-access-a-shared-mailbox-that-was-cr

Here is the process that you would need to follow in order to get it to work

Please note, the website says that you do not need to do this if your are running Exchange 2016 CU 10 or later. The Client was running 13 at the time, however these steps did work.

  1. Convert the shared mailbox to a regular mailbox by using the Exchange admin center in Exchange Online. To do this, follow these steps:
    1. Open the Exchange admin center in Exchange Online.
    2. Click recipients, and then click shared.
    3. Select the shared mailbox, and then click Convert.
    4. On the Warning page, select Yes to convert the shared mailbox.
  2. Create an on-premises object for the cloud mailbox by using the New-RemoteMailbox cmdlet in the Exchange Management Shell.

    Note This object must have the same name, alias, and user principal name (UPN) as the cloud mailbox.
  3. Set the ExchangeGuid property on the new on-premises object that you created in step 2 to match the cloud mailbox. To do this, follow these steps:
    1. Connect to Exchange Online by using a remote session of Windows PowerShell.
    2. Use the Get-Mailbox cmdlet to retrieve the value of the ExchangeGuid property of the cloud mailbox. For example, run the following command:

      Get-Mailbox <MailboxName> | FL ExchangeGuid 
    3. Open the Exchange Management Shell on the on-premises Exchange server.
    4. Use the Set-RemoteMailbox cmdlet to set the value of the ExchangeGuid property on the on-premises object to the value that you retrieved in step 3b. For example, run the following command:
      Set-RemoteMailbox <MailboxName> -ExchangeGuid <GUID>
  4. Wait for directory synchronization to occur. Or, force directory synchronization.
  5. Make sure that the Office 365 user object is displayed as “Synced with Active Directory.”
  6. Move the mailbox from Exchange Online to the on-premises environment.
  7. Convert the mailbox to a shared mailbox by using the Set-Mailbox cmdlet in the Exchange Management Shell. For example, run the following command:
    Set-Mailbox <MailboxName> -Type Shared
  8. Move the mailbox from the on-premises environment to Exchange Online.
I hope you found this guide helpful, and if you do please tell your friends.