Categories
Home Lab PowerCLI Starwind Virtual SAN Virtualization Vmware

Home Lab 2.0 – Starwind VSAN : The Greatest addition to my Home Lab

At the end of my previous post about The Beast I mentioned about lacking shared storage for my Virtual Hosts. My first thought was to go out and purchase a NAS like a Synology or a QNAP NAS. However I am trying to do this on the cheap and an extra $1200 when figuring in the cost of drives is just not in my budget. Now I am not sure about Synology, but I believe that they are comparable to QNAP in the sense that you can present disks as iSCSI LUN. Which I have done several times in the past and works brilliantly.

So here I am sitting in my office looking at the Beast and I was racking my brain trying to figure out what I can do with all this storage in this one box and how I can share it among my Virtual Hosts. I started looking at FreeNAS and running it as a VM in VMware Workstation and that worked! Until I had a power failure and the virtual disks became corrupted and I could not get them to come back online. Very Frustrating, my search continued.

Anyway, after doing some research I discovered Starwind VSAN. It allows you to take storage on a Windows machine and present it as an iSCSI LUN. I thought this is great and I signed up for a trial which gives you the ability to install it on one host but no graphical interface (it uses PowerShell) but unlimited LUNs. After some quick googling about the syntax I was able t piece together the commands with relative ease. Within a few minutes I was up an running with three new iSCSI LUNs and they were mounted in vCenter.

I mentioned earlier about having issues with FreeNAS and power failures, well ironically we had a power failure but Starwind VSAN came back online without a hitch. I was very impressed with how resilient it was. I have not had the chance to really put it through it’s paces, but so far I think I found a winner.

I plan to s follow up post once I really get off and running to the races so stay tuned for updates.
Categories
Home Lab Virtualization VMUG VMUG Advantage Vmware

Home Lab Version 1.0 – HP Envy x360

So I mentioned in a previous post about my history with setting up a lab. Now that I was without a place to test things I figured that I really didn’t need one and that I would be totally fine, and I was for a time. But then I joined VMUG and went to a UserCon for the first time. While I was there I got to meet other professionals in the “local” area and we talked about things that we are doing at our respective places of employment and I had the opportunity to see some the the amazing things going on in the industry at the time. I also learned about the VMUG Advantage, but I was not able to drop that kind of money ($200) on something that I was not ready to mess around with it. I did however go back to my work and tell my boss about it. Then I promptly forgot about it.

Fast forward a year later and VMUG USERCon is right around the corner. I am getting ready to ask off of work, and my boss reminded me about the VMUG Advantage and how I has asked to get a subscription. He remembered, he actually remembered!! So I took him up on the offer but I said I wanted to wait until I was there because they offer a discount.

Before going to UserCon my wife got me a New Laptop! It was an HP Envy x360. It came with an Intel i5 Processor, 8 GB of RAM, and a 1 TB HDD. Not only that, she got me the 16 GB upgrade kit! So I thought to myself that I could make this work. Being an engineer I came up with this whole plan to make it work.

So I go to USERCon and I purchase my first VMUG Advantage Subscription. It was amazing, I couldn’t wait to get home to play with it. the first thing that I did was install and configure VMware Workstation (I can’t remember what version it was at the time) and then I started building out a Domain Controller which I also installed VMware vCenter Server 5 on and even deployed 1 ESXi host. Then…. I ran out of RAM…. damn. I tried several times to make it work but I was just too constricted by my lack of memory and it was Maxed out.

I was really bummed out, but I did not allow that to deter me. I continued to use my laptop as my virtual lab, testing various version of Linux and appliances. It was actually the first laptop I used when I started my Blog back on Blogger.com. To this day it is still my workhorse and I consider it a cornerstone of my 3D Printing operation as I use it for 3D Modeling, Slicing, and controlling my printer. I still call it my work horse.

I am going to continue this series about my home lab adventure because there are some really exciting things ahead. I really want you to get the feeling for where I am coming from.

I hope you find this whole thing helpful and enlightening. If you do please thing about sharing this with your friends and Social media.

Categories
Home Assistant Home Automation Z Wave

Home Assistant / HASSOS 2020 Build out

With all that has been going on in the world I decided with all my extra free time to get back into my Home Assistant setup and do some updates. There had been many changes and updates since the last time I looked at my system and let me tell you right off the bat, my system was running great. It had been up for about a year or so since the last catastrophic failure, which in my defense was due to my SD card becoming no longer readable. Before that my Home Assistant (that’s right not HASS.io) ran for like 3 years before this happened.

So I logged into my HASS.io setup and decided to start updating…. and that is where things went wrong. I tried to install OpenZWave which caused my zStick to stop working and my APIs for my smart thermostat and IKEA TRADFRI stopped working as well.

Needless to say I had to start from scratch so I downloaded the latest version of HASS.io and turned off my Raspberry Pi. Here is what I am working with for this setup:

  • Raspberry Pi 3 B+
  • 128 GB San Disk SD Card
  • Aeotec Z-Stick Gen 5

I loaded up my setup and fired up the Pi….. then I realized I forgot to configure my static networking for HASS.io. Fiddle sticks, So I hit the power button on my USB Dongle, popped the SD card back in my PC and made the Network changes (I can create a walk through for this later, or you can RTFM on the Home Assistant Website. Then I replaced the SD card again and fired up the Pi, and after 3 hours, nada. It didn’t work. ARGH!!!!

Apparently HASSOS (the OS for HASS.io) does not like it when you pull the power out while it is attempting to download files and databases. Go figure.

So I powered off the Pi and flashed the Card again and we were off to the races. FYI, I didn’t do the network config file this time either and it worked fine…. Thanks DHCP!

Once I got to the log in screen my first order of business was to get Open Z Wave running. I went to the Supervisor section of Home Assistant and added the Open Z Wave Add-on. What I didn’t realize was the fact that I needed to install MQTT before Turning on the Open Z Wave service. I can go into details on that in a later post as well but for now just know 2 things. First, once you turn on Open Z Wave for the first time it may take 2 or 3 tries for it to actually start and stay started. Even then it will take about 2 minutes for the service to load (depending on your hard ware). 2. Even if you click start on boot, it does not start on boot.

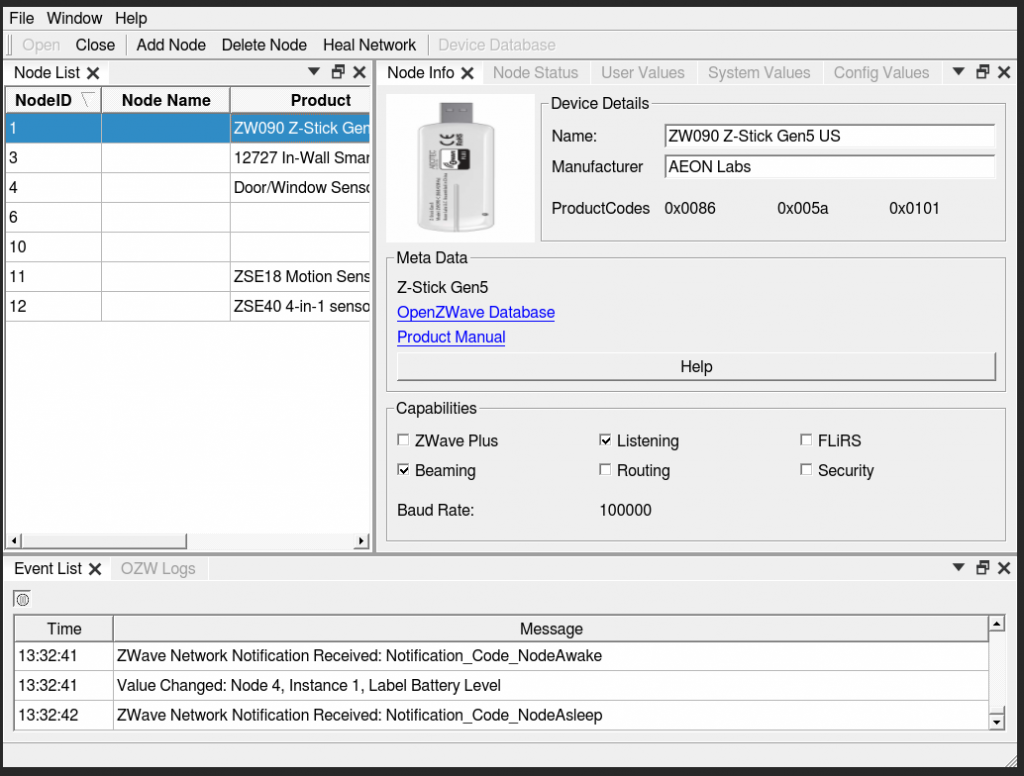
After all of that I finally got it to load as seen here:

Open Z Wave Dashboard

If I can give any first timers or even those who are used to the older Z Wave Interface any advice, it would be to be patient. It took about 12 hours for all of my Z Wave devices to finally report in.

Currently my Z Wave Devices are as follows

  • GE Z Wave Smart Switch (Gen 1)
  • Zooz Motion Sensor
  • Zooz 4 in 1 Sensor
  • Z Wave Door Sensor
  • Wave Door Sensor
  • GE Z Wave Smart Switch (Gen 2) (Not installed yet)

I am going to end this post here, but I plan to document my build out of Home Assistant and maybe even my VMware Home Lab where I might start to run Home Assistant on a VM!.

Categories
Virtualization Vmware

How to install VMware Workstation Professional 15

In my previous post about my new Home Lab spoke about installing VMware Workstation Professional 15. I wanted to follow up with this installation guide.

Once you get the installer downloaded, start off by double clicking it to run it.
At the Welcome screen, click Next to continue. 

On the End User License Agreement, Check the box that says I accept the terms in the License Agreement.

And click Next to continue

On the Custom Setup screen, check the box that says Enhanced Keyboard Driver. Now this will require a reboot of your PC when it is done so just be aware of that. Click Next to continue.

On the User Experience Settings screen, Click Next to Continue. 

On the Shortcuts screen, select which shortcuts you would like to have created as part of the install and click Next. 

On the Ready to install VMware Workstation Pro Screen, click Install.

The Installation will run for a few minutes until it is complete.

Once the installation has completed you will have a chance to Finish the installation or Apply your License now. If you choose to Finish the installation, you will still be able to use the application, but you will be using a Trial License. I will be continuing on with applying the license.

Enter your license key and click Enter.

Once you click Enter, you will be presented with the Completed Installation Screen. Click Finish to end the installation. You will then be prompted to restart your PC.

Click Yes to restart your PC, and once it comes back up, you are good to go!
I hope you found this post helpful, and stay tuned for more helpful guides and tips. 

Categories
Virtualization Vmware

VMware Home Lab 1.0

GREAT DAY IN THE MORNING!!!!!

Alright I had to find a different way to start this post, so I decided to borrow Pierre Roberts Catch phrase. I don’t think it worked so he can have it back. 
I wanted to take the time to talk about my home lab that I am currently using. As I mentioned in a previous post I have a Razer Blade 2018 which I will be using to run my lab for now. 
Stock the laptop comes with:
  • 8th Gen Intel Core i7 – 8750H Processor 6 Cores/12 threads up to 4.1 GHz
  • 1 TB M.2 SSD
  • 16 GB of RAM. 
I have been wanting to upgrade it to 32 GB of RAM since I purchased it, however $400 for 32 GB of RAM was just too much for me to swallow at the time. 
I had been watching the price of RAM (particularly for this laptop) for the last few months and saw that it was steadily declining. I finally decided to pull the trigger when it was down to 49% off on Amazon. 
The RAM Arrived a few days ago, and I installed it in the laptop, and I have to say it is awesome. I have never seen a laptop run this good. 
I installed VMWare Workstation Professional 15 (Thank you VMUG Advantage) and I will have a install guide out for that soon. 
I am also beginning to Spec out my VMware Home Lab 2.0 which will also be a Nested Solution. I will probably leverage my Kit.com account to show my parts list once I get it running. 
I hope you find this post helpful and stay tuned for updates.