Categories
Backups Docker Linux Windows

Urbackup – Open Source Network Backup

I know this is a little late for world backup day, but backups are needed everyday!

Today we will be talking about Urbackup. It is a Open Source network backup solution that you can use in your home or office network. I cannot express to you all the importance of a good backup solution. Working in the IT field as a consultant and MSP provider for many years I have seen my share of Clients who neglected their backups. Let me tell you, recovering from a failure without a good backup is not cheap. Remember it the question is not IF a failure will occur it is WHEN it will occur.

What is UrBackup?

Urbackup is a Web based backup solution that can backup Windows, Linux, FreeBSD and Mac (in beta) Operating systems. You can install Urbackup Server on both Linux or Windows.

There are two types of agents that you can install, Local or Internet. Internet Agents allow your computers to be backed up over the internet, however it is slower and requires a lot more configurations and infrastructure. For the purpose of this article we will focus on local.

How does Urbackup Work?
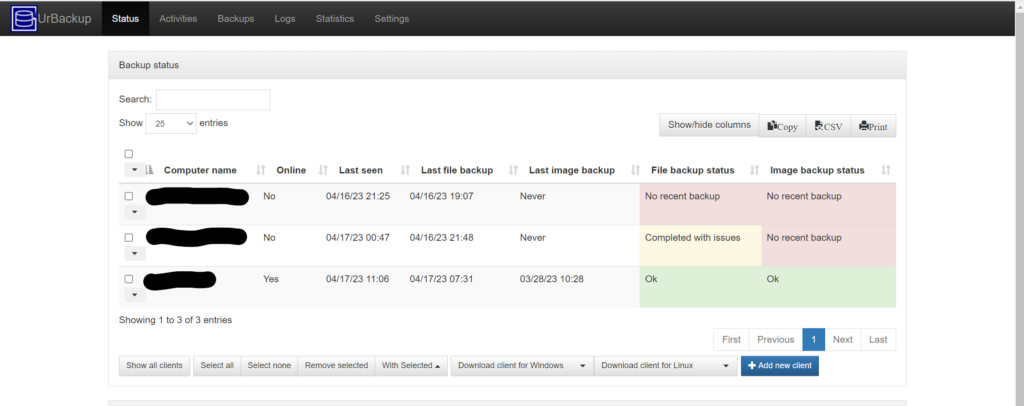
As you can see from the above screen shot the interface is pretty easy to read. Each computer that you have an agent on will be listed in the dashboard and the status columns are color coded to let you know how your backups are looking.

Installed Local agents will allow your machine to connect to 1 (you can do more, but it requires addtional configuration) Urbackup server. Urbackup will automatically perform file and image based backups (Image based is for Windows Only).

Imaged based restores can be intitated by either converting the image to a .vhd and mounting the image to a Windows computer or as a virtual machine such as Hyper-V. You can also use the bootable recovery disk to restore your image to your hardware in the event of a hardware failure.

Urbackup also allows you to view the backups that have been taken and drill down into them to restore individual files as seen below.
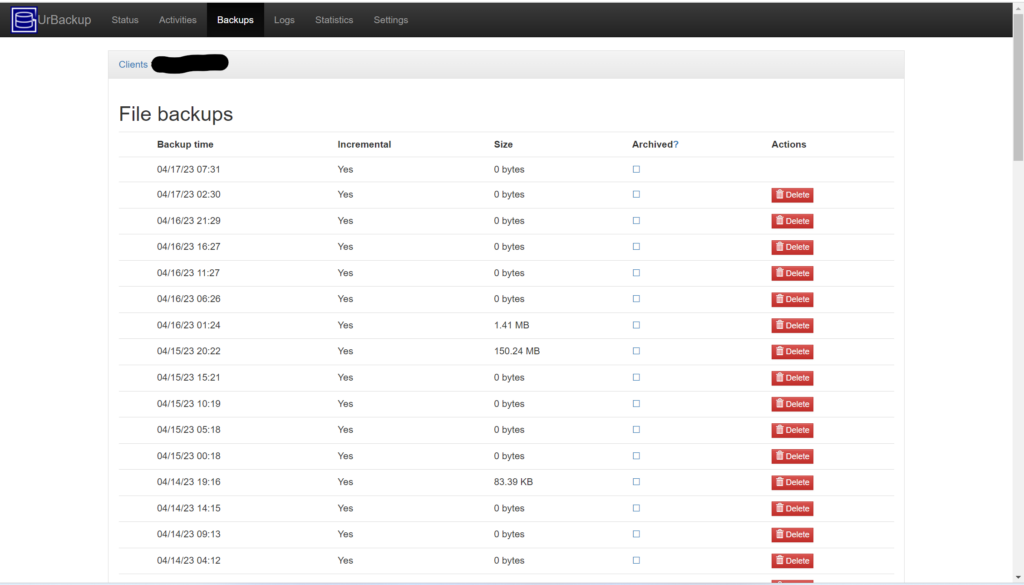
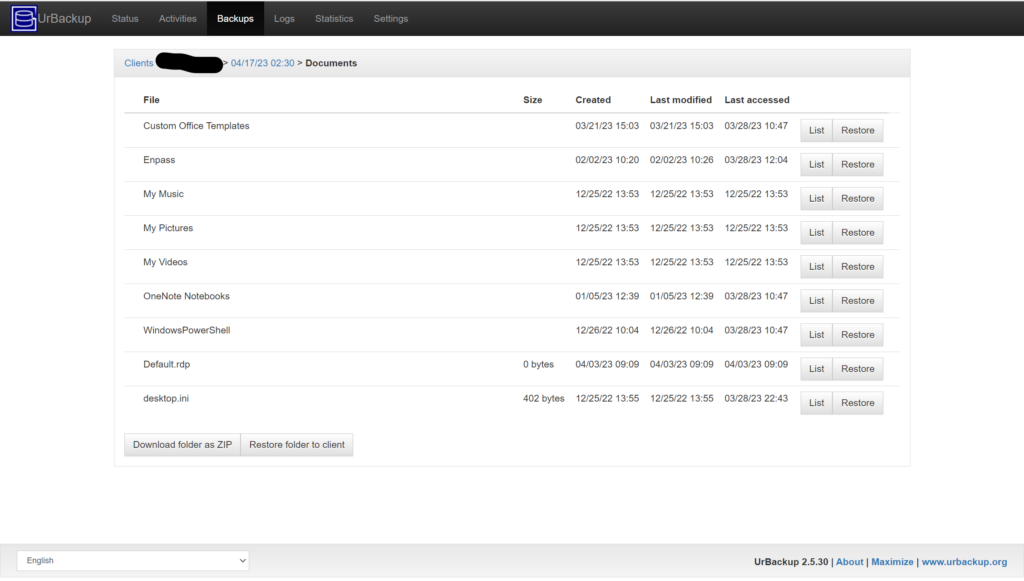
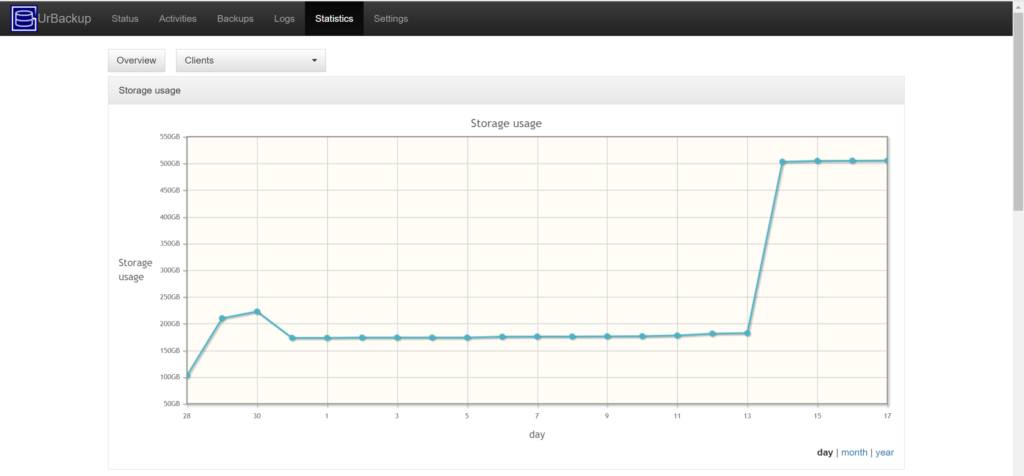
Reports and Statistics are also available and will show you how much space you are using without having to log into the actual server.
How can I get Urbackup?

As I mentioned earlier Urbackup is able to be installed on Linux and Windows. It is also able to be installed in a container such as Docker and there are many NAS appliances such as Synology which you can run the container on and provide storage.

Closing

I hope you found this article helpful and if you would like to learn more about it please feel free to reach out. Also if you want to learn about a different backup solution, check out this post on Duplicati.

Please share this out ot your friends as it could helpful to others.

Categories
Docker Linux PiHole Raspberry PI

Protect Your Family from Ads and Viruses with Pi-hole

I wanted to share with you all about a tool that I have been running in my house for several years now. As you can see in the title I want to show you how you can protect your family from Ads and Viruses with Pi-hole.

What is Pi-hole?

Pi-hole is a Linux application that was originally created to run on a Raspberry Pi. The purpose of the application is to block ads for all devices on your network. You think of it as an ad-blocker that you have on your computer but for your whole house.

A few years ago I would have told you the best way to run Pi-hole would be to purchase a Raspberry Pi, but now it is next to impossible to find one new for less than double MSRP.

As this program has matured so has the installation options. Now you can install it on any version of Linux, Run it in a Docker Container.

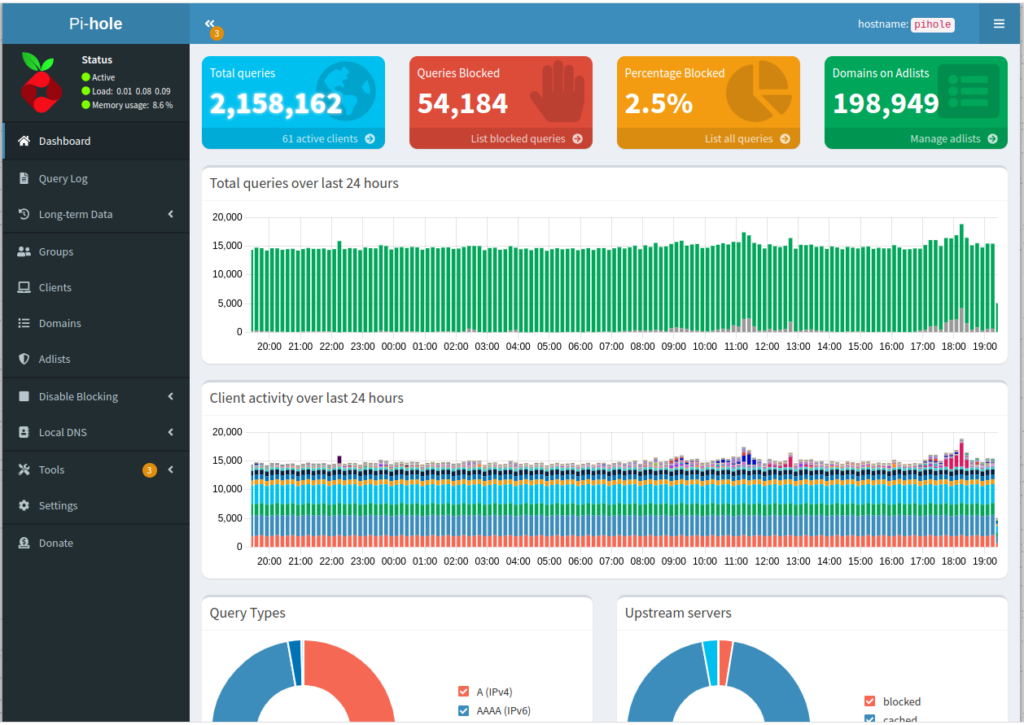
Once the installation has been completed and you log in you will be presented with your dashboard. Obviously your dashboard will not be populated with data like my example below.

pihole dashboard

From here you can configure Pi-hole to act as your DHCP server which will allow all the devices on your network to use Pi-hole as an Ad blocker. I will go into more details about these advanced features some time soon.

What does Pi-hole do?

Pi-hole is a DNS based Ad blocker that protects your network devices from Ads. You might not think that Ads are that big of a deal, but the New York Times did a study on their own website and found that over 300 ads were being purchased by bad actors who embedded viruses and malware.

Pi-hole uses DNS to block Ads from showing up on your browser. If the browser is not able to show the Ad then malware is not able to load and therefore you are safe.

What are the downsides?

As we all know there are downsides to everything. Pi-Hole is no exception to this rule. Here are a list of the issues that I have ran into why using Pi-Hole:

  • Ads in Mobile games on your network will not work (this could annoy your family)
  • Constant Contact Links will not work.
  • Ads on web pages will not work and could result in web pages not loading correctly
  • Certain News sites will detect that you are running an ad blocker and not allow you to read the articles.
  • Ads that are blocked prevent content creators from gaining revenue from monetized ads on their site.

Closing

As with all things you will need to balance the good with the bad. If you don’t see the downsides as being doing much of a hindrance and would like to learn more. Please feel free to reach out to me for more information on how to get setup with your own Pi-hole.

I hope you found this post helpful and if so please feel free to share it around with your friends.

Categories
Linux Zabbix

Upgrade Zabbix Proxy from 6.0 to 6.2

I was recently going through the process of upgrading one of my Zabbix Proxy nodes following the upgrade documentation from Zabbix and needless to say there were issues. That is why I have decided to document how to Upgrade Zabbix Proxy from 6.0 to 6.2. This process will probably work for 6.0/6.2 to 6.4, but I have not tested it yet.

Let’s step through the process of upgrading and I will show you were the issue is. We will be performing this work on a Debian/Ubuntu based machine.

Upgrade Procedure

Before you begin, you will need to stop the Zabbix Proxy Service

Sudo service zabbix-proxy stop

Once the service has been stopped you will then want to make a backup, just encase things don’t go as planned

sudo mkdir /opt/zabbix-backup/
sudo cp /etc/zabbix/zabbix_proxy.conf /opt/zabbix-backup/
sudo cp -R /usr/share/zabbix-* /opt/zabbix-backup/

Once the backups are complete you will need to update your repository configuration package. You will start by uninstalling your current repository package.

sudo rm -Rf /etc/apt/sources.list.d/zabbix.list

This is where the guide goes off the rails. Even if you uninstall the current package repository, it does not remove it from the sources list. I somehow figured out that you need to run the following or this process will not work.

sudo dpkg --purge zabbix-release

Once you run this command you can proceed as normal. You will need to download the a new repository package and install it. Please note that you will need to make sure that you are using the correct OS and version number. I am using Debian 11 in the below example.

sudo wget https://repo.zabbix.com/zabbix/6.2/debian/pool/main/z/zabbix-release/zabbix-release_6.2-1+debian11_all.deb
sudo dpkg -i zabbix-release_6.2-1+debian11_all.deb

Once you have installed the package you will need to run a apt update to refresh your package list

sudo apt-get update

Here is another part of the Zabbix guide that I have had varing levels of success with. The guide wants you do to the following

sudo apt-get install --only-upgrade zabbix-proxy-mysql zabbix-frontend-php zabbix-agent

However sometimes it will not perform the upgrade if there are dependencies that need to be addressed so you should be able to just get away with

sudo apt-get upgrade

After the upgrade has been compeleted you need to restart the services or the proxy will not work until you reboot.

sudo service zabbix-proxy start

To verify that the the upgrade was successful you should run

sudo zabbix_proxy -V

If it shows the correct version of zabbix then you are good to go.

I hope you found this guide to be helpful and if so please share it with your friends. Also check out our other article on how to upgrade your Zabbix Server 6.0 to 6.2.

Categories
CentOS Linux Zabbix

Upgrade from Zabbix 6.0 to 6.2 on CentOS 8

Zabbix is an open source monitoring system that can monitor almost anything. You can learn more about Zabbix here. For the purpose of this article I will using the predeployed Zabbix Appliance from Linode. Linode is a cloud based hosting service that offers really good pricing for Linux based servers. Best of all they have a datacenter that is really close to my house. You can learn more about Linode and their services here. If you are a new sign up they run a deal sometimes to get a free $100 credit which you could use toward running your VM.

Prep work

The first piece of advice that I can give while you are working on the upgrade you should open a second ssh session to your server and run the following command:

 sudo tail -f /var/log/zabbix/zabbix_server.log

This will give you a better view of what is going on with the application once you start the service back up.

The next step is to stop the Zabbix Server Service

systemctl stop zabbix-server

From here Zabbix reommends backing up your configuration files.

This command will create a new backup folder

mkdir /opt/zabbix-backup/

These commands will copy your config files to your backup folder

cp /etc/zabbix/zabbix_server.conf /opt/zabbix-backup/
cp /etc/httpd/conf.d/zabbix.conf /opt/zabbix-backup/

This will copy your .php files to your backup folder

cp -R /usr/share/zabbix/ /opt/zabbix-backup/
cp -R /usr/share/zabbix-* /opt/zabbix-backup/

Starting the update

To proceed with the upgrade your current repository package has to be updated.

rpm -Uvh https://repo.zabbix.com/zabbix/6.2/rhel/8/x86_64/zabbix-release-6.2-1.el8.noarch.rpm

Switch the DNF module version for PHP:

dnf module switch-to php:7.4

To upgrade Zabbix components run the following command:

dnf upgrade zabbix-server-mysql zabbix-web-mysql zabbix-agent

Post upgrade work

Once the packages have been updated you will need to open your database. In my case I would type in mysql. Then according to the Zabbix documentation you need to run this command.

SET GLOBAL log_bin_trust_function_creators = 1;

One of the issues that I ran into, and I am not sure if this is just a Linode appliance issue or a CentOS issue but I had to run the following command. If I did not run this command the update would fail at 43% everytime.

grant all privileges on zabbix.* to 'zabbix_srv'@'localhost';

Once that is complete type quit and hen type thhe following command to start the Zabbix service.

systemctl start zabbix-server

Once you press enter the log file that you opened at the begin displaying output and you should see the entire startup processs and then update.

I hope you find this guide helpful and if so please share it with others.

Categories
Linux Ubuntu

How to interact as root in Ubuntu

I recently learned that you can interact with the Ubuntu BASH shell as root. In my lab I have been playing with a whole bunch of new applications and servers running on Ubuntu.

I recently was installing a Zabbix Proxy to monitor and I needed to run the installer as root. This was a wierd concept as I thought you were only able to use sudo in front of the command to be able to elevate the permissions. I thought root was out of the question with Ubuntu.

It turns out if you need to work in root you can simply type the following:

“sudo -i”

After typing in your password you will be given a root prompt. This really blew my mind consindering I had been using ubuntu for a while and never knew this was an option.

I hope this helps someone out there as I had no idea that this was even a thing.

Categories
Linux

How to see what iSCSI targets are connected to a CentOS Host

I was working on a server after there was an outage on the storage system which was a iSCSI QNAP NAS.

I did a little Google searching and found this command which worked wonderfully

iscsiadm -m session

This will give you a list of all of the devices connected via iSCSI, including the IP Address of the device you are connecting to.

Hopefully, by documenting this I will be able to remember it when I need it in the future. 
If you found this helpful, please share it with your friends, and if you are interested in some of the hardware mentioned in this post, please check the affiliate links below. 
QNAP 8 bay NAS
QNAP 4 bay NAS
Synology 2 Bay NAS