Categories
Docker Linux PiHole Raspberry PI

Protect Your Family from Ads and Viruses with Pi-hole

I wanted to share with you all about a tool that I have been running in my house for several years now. As you can see in the title I want to show you how you can protect your family from Ads and Viruses with Pi-hole.

What is Pi-hole?

Pi-hole is a Linux application that was originally created to run on a Raspberry Pi. The purpose of the application is to block ads for all devices on your network. You think of it as an ad-blocker that you have on your computer but for your whole house.

A few years ago I would have told you the best way to run Pi-hole would be to purchase a Raspberry Pi, but now it is next to impossible to find one new for less than double MSRP.

As this program has matured so has the installation options. Now you can install it on any version of Linux, Run it in a Docker Container.

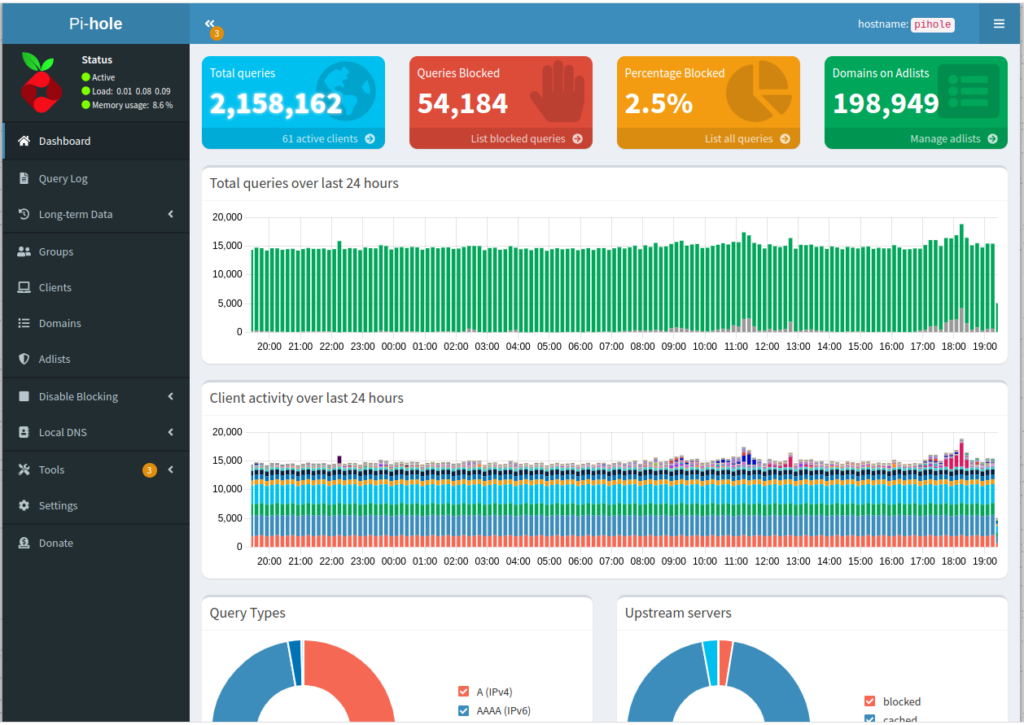
Once the installation has been completed and you log in you will be presented with your dashboard. Obviously your dashboard will not be populated with data like my example below.

pihole dashboard

From here you can configure Pi-hole to act as your DHCP server which will allow all the devices on your network to use Pi-hole as an Ad blocker. I will go into more details about these advanced features some time soon.

What does Pi-hole do?

Pi-hole is a DNS based Ad blocker that protects your network devices from Ads. You might not think that Ads are that big of a deal, but the New York Times did a study on their own website and found that over 300 ads were being purchased by bad actors who embedded viruses and malware.

Pi-hole uses DNS to block Ads from showing up on your browser. If the browser is not able to show the Ad then malware is not able to load and therefore you are safe.

What are the downsides?

As we all know there are downsides to everything. Pi-Hole is no exception to this rule. Here are a list of the issues that I have ran into why using Pi-Hole:

  • Ads in Mobile games on your network will not work (this could annoy your family)
  • Constant Contact Links will not work.
  • Ads on web pages will not work and could result in web pages not loading correctly
  • Certain News sites will detect that you are running an ad blocker and not allow you to read the articles.
  • Ads that are blocked prevent content creators from gaining revenue from monetized ads on their site.

Closing

As with all things you will need to balance the good with the bad. If you don’t see the downsides as being doing much of a hindrance and would like to learn more. Please feel free to reach out to me for more information on how to get setup with your own Pi-hole.

I hope you found this post helpful and if so please feel free to share it around with your friends.

Categories
Home Assistant Home Automation Smart Home WiFI Z Wave Zigbee

Smart Home Series – It’s been a long road

Introduction

From the time that I started this blog I always wanted to use it as an education tool for people looking at getting into home automation. That is why I am going to start this smart home series, starting with the basics.

For the past 3 months I have been working add and upgrade my home automation setup in my home. I think that now is the time that I am ready to start sharing what I have learned.

I try not to broadcast to the world that I am into home automation as for the most part people either don’t care or don’t know what it is. My wife however likes to tell everyone how complicated I have made things in our house due to my “tinkering”.

Home Automation is a vast subject and as time goes on it keeps getting bigger. New products and features are constantly being added to the market and it is very easy for consumers to get overwhelmed or make the wrong choices. Vendor lock-in and a lack of presence in retail stores makes it difficult for people to understand all of the subtle nuances of Home Automation. Another problem in the home automation market has always been the price.

Cost

Lets address the biggest elephant in the room when it comes to home automation, the price. The reason for the high cost of entry and additions for home automation is simple. Home Automation is an enthusiast market and they know that people who want to do these things will pay the price. Some people will say that the COVID-19 pandemic and chip shortage had something to do with it, but from having done this for about a decade, it was never cheap or even affordable.

There are opportunities out there to find reasonable deals on smart home devices, but those deals are not always what they seem.

Vendor Lock-in

Another issue that I have seen is vendors who say that they work well with others, but in reality they are not. I must admit that within the last 5 or so years vendors have gotten better about their interoperability with other vendors, but that has not always been the case. When I first started “playing” with home automation I started off with a Nexia Home router. My wife and got me a starter kit when I first started looking into Home Automation and I thought it was the greatest thing ever. It operated using Z-Wave and could control a single plugin switch that you could used to plug a lamp or something into. If you don’t know what Z-Wave is don’t worry I will be doing a post about that soon.

The problem came when I went to purchase another device and pair it to the hub. I looked on their website and nothing was less than $60 for a room sensor. On top of that they wanted to charge me monthly per device to have it connect to a Hub in my own house! On top of that I went out and found another Z-Wave certified device and tried to pair it and it would not. Then I tried to take the Nexia Z-Wave Certified device and tried to pair it to something else and that didn’t work either. Needless to say, the hub and outlet has been sitting in a box.

Installation Issues

When I first got into home automation there were only a very few players in the space. As I mentioned above this lead to higher pricing, poor support (documentation), and installations were jankie at best. If you wanted to make your lamp “smart” there were no such things as a smart lightbulb or an in-wall outlet. Your only options were having an external “smart” socket or cut your power cord and put in an inline smart relay.

Also when smart light switches started to be released they were large and bulky, which made them difficult or impossible to install in older home junction boxes. Also they required a Neutral line to the device to provide a constant flow of power to the device. This can also cause a problem with people in older houses making home automation next to impossible.

Things are getting better

Flash forward a few years and IKEA came out with their TRADFRI smart home devices that required their own hub to operate. After doing some searching online I discovered that the TRADFRI lightbulbs could be reprogrammed and with a little scripting and access to the Smartthings developer console, you could get it to work with the Samsung Smartthings Hub!

As of the writing of this article, I have since retired the IKEA TRADFRI hub (it died, RIP) and my Samsung Smartthings Hub in favor of running my own smart up with a Raspberry Pi and a Z-Stick for ZWAVE and a Sonoff USB stick for Zigbee. With it I can connect almost any device without additional programming.

As home automation and smart home devices are maturing there have been massive improvement in the number of vendors creating new and exciting products all the time such as smart light bulbs, LED strips, thermostats, motion sensors,, door locks and smart egg cartons. Switches are getting smaller and thinner and no longer requiring a neutral wire opening up a whole new world of possiblilites.

Having more vendors in the space has also caused a bit of a bidding war for customers. This is great news for consumers as that means prices are starting to drop. Also with more vendors in the space jockying for position they are also creating products using different technology (Wifi, Zigbee, and ZWAVE). This means as long as you are using a vendor agnostic controller (Home Assistant, OpenHAB, etc) , you have a world of options at your fingertips.

I am going to end this post here, but I plan on doing a deeper dive into home automation and the different technology options available to help those you are interested in making an informed decision.

Categories
Raspberry PI Raspbian Tools VMUG

VMUG Controller and how I finally got it working

So a last year one of the projects I was working on that consumed me was trying to set up a VMUG Controller. The VMUG Controller is a Raspberry Pi appliance that allows you to check in and events and has a printer to print out a name badge. The whole system is a closed environments which means to access the web page you need to be connected to the vmugc Wifi. The whole process for setup has been very well documented by Dan Barr of the Central PA VMUG. You can find the instructions here on his Github.

However no matter how good the instructions are there are a few issues that need to be addressed.

Hardware: You need to use either a Raspberry Pi 2 or Pi 3 B+

Operating System: Rasbian Jessie – In order for the installation script to work you need to find the right version of Raspbian Jessie (I think this is the right version). If not you can find older versions of Rasbian here.

Do not Update the OS or this will break the whole thing. You will also need to install PHP7 as Jessie only has PHP 5 which you can find instructions on how to do that below.

How to install php7 on Raspbian
://help.nextcloud.com/t/upgrade-php5-to-php7-on-raspbian-jessie-8-0/24537

Once this is complete you can proceed with following the installation script.

Once the install has completed you will then see the new WiFi SSID VMUGC which you will need to connect to in order to access the web page.

After that it should just work.

I hope you found this post helpful, If so please share it with your friends. We could really use the support and to get the word out there.

Smartthings to Home Assistant using MQTT

I have been away for a while, but in my absence I have been playing with a Home Automation System called Home Assistant. You can find out more about it here on their website: https://home-assistant.io/ 

One of my Father’s Day Gifts from my Wife and Kids was a SmarThing Hub with a Arrival sensor. Now Home Assistant has literally hundreds of pre-built integrations however SmartThings is not one of them. To make it work with Home Assistant you will have to use a protocol called MQTT which is very versatile and can be used to create your own Automations.  (Find out more about it here.)

Now my Home Assistant instance is running on a Rasberry Pi 3 (also a Father’s Day Gift) however it also runs on a Raspberry Pi 2. I am also running HASSbain which is a Raspian image created by Home Assistant. As for MQTT there are a few products out there that you can use, I prefer Mosquitto as there seems to be more guides out there on how to configure and manage it.

Start off by checking for and installing updates for Raspian:

sudo apt-get update

sudo apt-get upgrade

this could take a while depending on your setup.

Next you will need to setup the smarthings-mqtt-bridge via npm
sudo apt-get install npm

sudo npm install -g smartthings-mqtt-bridge

Then you will need to setup pm2 to run the processes
sudo npm install pm2 -g

Once installed you will need to create and edit smartthings-mqtt-bridge config
sudo cp /usr/local/lib/node_modules/smartthings-mqtt-bridge/_config.yml ~/config.yml

sudo nano ~/config.yml
Here is what the mqtt-bridge-configuration ~/config.yml file should look like if all is configured correctly.
mqtt:
  # Specify your MQTT Broker’s hostname or IP address here
  host: mqtt://localhost
  # Preface for the topics $PREFACE/$DEVICE_NAME/$PROPERTY
  preface: smartthings

  # Suffix for the state topics $PREFACE/$DEVICE_NAME/$PROPERTY/$STATE_SUFFIX
  # state_suffix: state
  # Suffix for the command topics $PREFACE/$DEVICE_NAME/$PROPERTY/$COMMAND_SUFFIX
  # command_suffix: cmd

  # Other optional settings from https://www.npmjs.com/package/mqtt#mqttclientstreambuilder-options
  username: pi
  password: mqttpass

  # Port number to listen on
  port: 8080

Now that all of the local configurations have been completed you need to configure the SmartThings Device handler, Device, and SmartApp using steps outlined in https://github.com/stjohnjohnson/smartthings-mqtt-bridge150

Device Settings
IP: raspberry pi IP
MAC: Raspberry pi MAC
Port: 8080

Next you will need to add mqtt to HomeAssistant config configuration.yaml
mqtt:
  broker: localhost
  port: 1883
  client_id: home-assistant-1
  username: pi
  password: mqttpass

Now you will need to add your devices to their own file, or configuration.yaml
Since I am using mine for presence detection mine looks something like this

device_tracker:
  – platform: mqtt
    name: “MQTT Presense Detection”
    devices: 
      Friendly Name: smartthings/device name/presence
      Friendly Name1: smartthings/device name/presence
     
Now you will need to start the bridge

sudo ln -s “$(which nodejs)” /usr/local/bin/node
pm2 restart smartthings-mqtt-bridge

restart Home Assistant
sudo systemctl restart home-assistant.service

That should do it. You may want to sudo reboot

In the future I may do more of these as I have learned at lot from it, including beginning to dabble with Docker.