Categories
Home Assistant Home Automation WiFI

Merkury Smart Wi-Fi LED Color Bulb – A good budget smart light bulb

Today I would like to talk about the Merkury Smart Wi-Fi LED Color Bulb. I have been planning on writing something about this for some time now and for some reason the opportunity never came about. I figured I would diverge from my new Smart Home Series a little bit to talk about one of the many different options that are out there.

Background

A while ago, I was walking through the local Walmart, and while walking down the midway near electronics I came across a bin filled with these Merkury brand smart LED bulbs. I decided that $12 was a reasonable price for a “smart” light bulb. You can now find a 2 pack of them on Amazon for $11.99.

Merkury Innovations Smart Wi-Fi Dimmable White

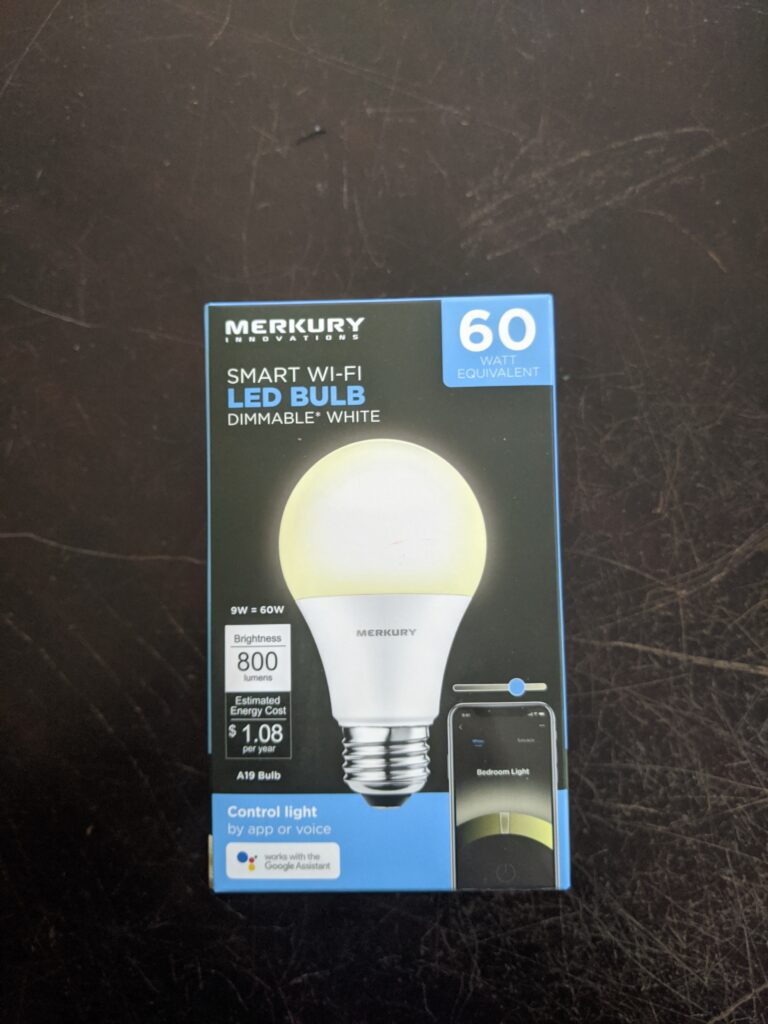
I no longer have the Color LED packaging. So I am posting a picture of the white bulb which was only $9 at Walmart.

Impressions

My first impressons of the product was that it looked very polished like they knew what they were doing. Not all smart devices can claim that. After unpackaging the the bulb I found the setup instructions which directs you to download the Geeni app. Doing some research you will find that they are the same company.

As I have already been using Tuya / Smartlife app for my wifi enabled smart devices I tried to pair it to that app instead and it worked which is a plus for adoption.

One of the pros of using a WiFi smart device is that it uses your already exisiting Wifi network. Another plus is that you will not need a smart hub running in your house.

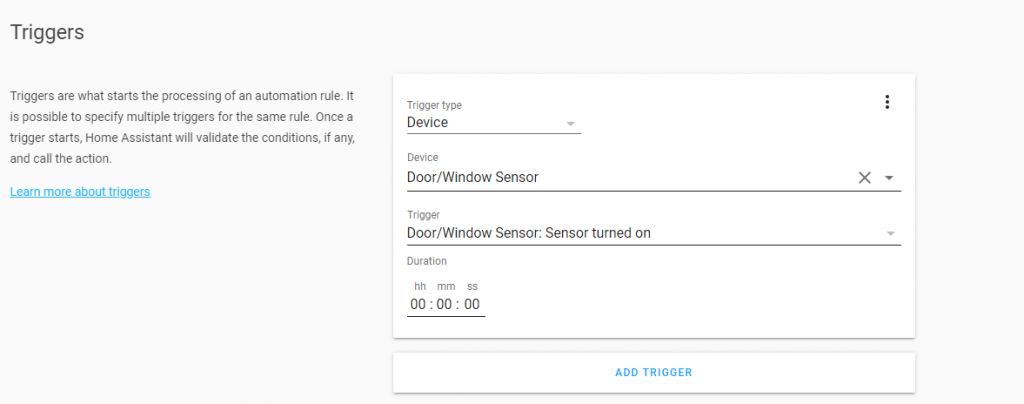
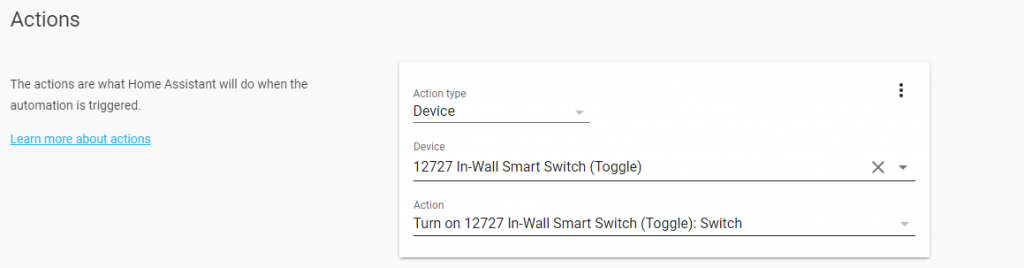
Once under management you these bulbs are able to work with your favorite voice assistant (Google Home, Alexa, Homekit). Also with the correct integrations (Tuya) you can integrate the control of these lightbubs into Home Assistant.

Final Thoughts

At such a low pricepoint and it’s ease of use, the Merkury Snart WiFi Light bulbs are an excellent addtion for the beginner smart home enthusiast. One word of warning about this product is that I would make sure to pick a well established company to host the brains of your operation (Tuya, SmartLife). There have seen many companies that support WiFi devices come and go over the years. I always prefer to pick a company that is been aroudn for a while.

I hope you found this post helpful and if so please consider sharing it with your friends.

Categories
Home Assistant Home Automation Smart Home WiFI Z Wave Zigbee

Smart Home Series – It’s been a long road

Introduction

From the time that I started this blog I always wanted to use it as an education tool for people looking at getting into home automation. That is why I am going to start this smart home series, starting with the basics.

For the past 3 months I have been working add and upgrade my home automation setup in my home. I think that now is the time that I am ready to start sharing what I have learned.

I try not to broadcast to the world that I am into home automation as for the most part people either don’t care or don’t know what it is. My wife however likes to tell everyone how complicated I have made things in our house due to my “tinkering”.

Home Automation is a vast subject and as time goes on it keeps getting bigger. New products and features are constantly being added to the market and it is very easy for consumers to get overwhelmed or make the wrong choices. Vendor lock-in and a lack of presence in retail stores makes it difficult for people to understand all of the subtle nuances of Home Automation. Another problem in the home automation market has always been the price.

Cost

Lets address the biggest elephant in the room when it comes to home automation, the price. The reason for the high cost of entry and additions for home automation is simple. Home Automation is an enthusiast market and they know that people who want to do these things will pay the price. Some people will say that the COVID-19 pandemic and chip shortage had something to do with it, but from having done this for about a decade, it was never cheap or even affordable.

There are opportunities out there to find reasonable deals on smart home devices, but those deals are not always what they seem.

Vendor Lock-in

Another issue that I have seen is vendors who say that they work well with others, but in reality they are not. I must admit that within the last 5 or so years vendors have gotten better about their interoperability with other vendors, but that has not always been the case. When I first started “playing” with home automation I started off with a Nexia Home router. My wife and got me a starter kit when I first started looking into Home Automation and I thought it was the greatest thing ever. It operated using Z-Wave and could control a single plugin switch that you could used to plug a lamp or something into. If you don’t know what Z-Wave is don’t worry I will be doing a post about that soon.

The problem came when I went to purchase another device and pair it to the hub. I looked on their website and nothing was less than $60 for a room sensor. On top of that they wanted to charge me monthly per device to have it connect to a Hub in my own house! On top of that I went out and found another Z-Wave certified device and tried to pair it and it would not. Then I tried to take the Nexia Z-Wave Certified device and tried to pair it to something else and that didn’t work either. Needless to say, the hub and outlet has been sitting in a box.

Installation Issues

When I first got into home automation there were only a very few players in the space. As I mentioned above this lead to higher pricing, poor support (documentation), and installations were jankie at best. If you wanted to make your lamp “smart” there were no such things as a smart lightbulb or an in-wall outlet. Your only options were having an external “smart” socket or cut your power cord and put in an inline smart relay.

Also when smart light switches started to be released they were large and bulky, which made them difficult or impossible to install in older home junction boxes. Also they required a Neutral line to the device to provide a constant flow of power to the device. This can also cause a problem with people in older houses making home automation next to impossible.

Things are getting better

Flash forward a few years and IKEA came out with their TRADFRI smart home devices that required their own hub to operate. After doing some searching online I discovered that the TRADFRI lightbulbs could be reprogrammed and with a little scripting and access to the Smartthings developer console, you could get it to work with the Samsung Smartthings Hub!

As of the writing of this article, I have since retired the IKEA TRADFRI hub (it died, RIP) and my Samsung Smartthings Hub in favor of running my own smart up with a Raspberry Pi and a Z-Stick for ZWAVE and a Sonoff USB stick for Zigbee. With it I can connect almost any device without additional programming.

As home automation and smart home devices are maturing there have been massive improvement in the number of vendors creating new and exciting products all the time such as smart light bulbs, LED strips, thermostats, motion sensors,, door locks and smart egg cartons. Switches are getting smaller and thinner and no longer requiring a neutral wire opening up a whole new world of possiblilites.

Having more vendors in the space has also caused a bit of a bidding war for customers. This is great news for consumers as that means prices are starting to drop. Also with more vendors in the space jockying for position they are also creating products using different technology (Wifi, Zigbee, and ZWAVE). This means as long as you are using a vendor agnostic controller (Home Assistant, OpenHAB, etc) , you have a world of options at your fingertips.

I am going to end this post here, but I plan on doing a deeper dive into home automation and the different technology options available to help those you are interested in making an informed decision.

Categories
Home Assistant Home Automation WiFI Z Wave

Upgrading your home security with August Smart Locks

Introduction

Well it finally happened, I decided to take the plunge into the world of smart locks. More specifically, the August Smart Lock Pro Generation 3 with Connect Wifi Bridge. I have actually been looking into it for a while and I had the opportunity to purchase a first generation August Smart Lock on clearance at Walmart for $50. That was such a great deal that I thought it had to be a lie. So I passed it up. Fool!!

In all reality it was not that big of a deal. A few years ago, August Smart locks were only able to be managed via Bluetooth. Meaning you had to have your phone (or tablet) with the August Smart home app near the lock to be able to use it. This would not have been an ideal long term solution as I would not be able to remotely manage it.

Moving on to present day, the catalog of items available from August has expanded, to say the least, to include WiFi and Z-Wave as options for management and integrations to include platforms like Voice Assistance (Google Home, Alexa, and Apple Home Kit), and Smart home platforms such as Home Assistant (which I use in my own home).

Unboxing

Upon opening the box I have to say I was pretty surprised at how little there was inside. You get a lock, a bracket, the connect bridge, a door sensor, a little baggie with plastic tubes, and masking tape… and that is about it. Now that I write it down it seems like a lot of items, however the way it was packaged made it seem so insignificant. One thing not in the box that took me for a loop was the lack of instructions. There was a slip of paper that instructed me to download their app.

Installation

So following the “instructions” I downloaded the app which then walks you though the process of creating an account. Once you are logged in, you will be given the option to add a device. From here it is pretty much follow the steps on the screen as it walks you through mounting the lock and connecting it to your device and then downloading and installing firmware updates.

This is where I had a problem, because your phone has to connect to the lock via Bluetooth which means you have to stay near the lock while it updates. This can take some time depending on how close you stay to the lock.

Once the firmware has been updated you will be then prompted to setup the Connect WiFi Bridge which was pretty quick and straight forward.

Troubleshooting Issues

So because I am impatient I may have messed up the firmware update the first time which left my smart lock in an inconsistent place. This also gave me the opportunity to call tech support. Which was an interesting experience. Since I registered my cell phone number when I created my account, when I called, I was greeted with “Hello, Kenneth”. After navigating the call tree I was then told that the hold time was 59 minutes. I dropped the call and just did a factory reset on the lock.

First Impressions

I have to admit that it is pretty cool once the lock is installed and app is connected. It is very easy to unlock from your phone, and you are able to invite other members of your family to use your lock with relative ease. Even the transition from Bluetooth connected to WiFi happens seamlessly. So far I am giving this product my stamp of approval. I will do an update on this once I get it fully integrated into Google Home, Alexa, and Home Assistant.

I hope you found this post helpful and if so please consider sharing this with your friends and family who might me interested in purchasing a smart lock.

Categories
Home Assistant Home Automation Z Wave

Inovelli Smart Bulbs

While I was in the planning phases of my blog move I wanted to find new sources of content for the blog. As I was shopping on Amazon for ZWave sensors I came across this company called Inovelli. I had never heard of them before and I kind of dismissed them and went on my way. But after a while I figured I would check them out.

Inovelli is a US based company and they make all their own products even down to the firmware. For my test of their products I decided to order 2 smart bulbs (one is being and open box and discontinued as the other one is their brand new Ilumin Bulb) since I had just purchased the Merkury Wifi Smart Bulb from Walmart and I was not unfamiliar with smart bulbs.

The packaging was not very impressive, in fact it was a little hard to figure out which was the open box and which was brand new aside from the label on the box. The bulbs were just rattling around in the box and were a little difficult to get out. That aside I am pretty impressed with the product.

The setup was pretty simple (after you read the instructions) and once the device was paired and I rebooted my Z Wave Controller it showed up immediately. They also work great with Home Assistant just an FYI there. The lights were bright and very responsive.

My Usage for these bulbs

You might be asking, Why do you want/need a ZWave smart bulb when you can get a smart switch? For me I am using one of these bulbs for a 2 fold purpose. The first being I have a pull chain light switch in my utility room in my basement and I don’t want to have to go through the trouble of setting up a smart switch. and secondly, as they are connected to power 100% of the time, and they actually will act as a ZWave extender/repeater (which I can go into at a later time) to expand my network.

I think if you are in need of a smart bulb and already have an existing Z Wave network you should really look into these Inovelli Smart Bulbs. I really regret not purchasing their colored bulb which I hope to purchase soon and have a review up for it soon.

Categories
Home Assistant Home Automation Z Wave

UPDATE!! Home Assistant: Open Z Wave Add-in 0.5.0 not working

So I just ran into this issue with my Home Assistant Setup. I logged in for the first time in about a week and found that I had an update available for the Open Z Wave Add-On. Oddly enough the check box that says Auto Update does nothing.

Anyway so I updated thinking everything would be okay….. WRONG!!!

After doing the upgrade and rebooting the appliance the Open Z Wave admin console would fail to load and the service would not start. I tried several times as that is normally what I have to do. Which by the way the the start on boot up also never works.

I checked the Home Assistant forums and found this thread. It turns out that the the issue is actually with MQTT. Apparently MQTT is presenting an invalid response which is causing Open Z Wave to barf. One of the options listed was to use an MQTT Browser to delete the entry and that has worked for some people to varying levels of success.

It did not work for me, but here is what I did:

  • Back up your configurations before you do any of this.
  • Step 1: Uninstall Open Z Wave from Supervisor > Add-ons
  • Step 2: Uninstall MQTT
  • Step 3: Reboot Home Assistant hardware
  • Step 4: Install MQTT again and make sure it is configured and then Start the services.
  • Step 5: Install Open Z Wave and make sure it is pointing to the correct ZWave Antenna and start service.

I then checked the Z Wave log to make sure the error was gone (and it was!!)

UPDATE!! Within about an hour of making this post I discovered that my whole Zwave setup was not working and the service eventually crashed. This morning I ended up doing a fresh install and I was able to pull down OpenZwave 0.5.1 and that seems to be working. I will update once I have more information.

I hope you found this post helpful, and if so please share with your friends.

Categories
Home Assistant Home Automation Z Wave

Home Assistant Build out continued… Setting up Automation

I believe we left off last time with all of my Z Wave devices finally showing up after being patient. Now it is time to setup my favorite (also the first I ever did) which is to turn on my office lights when the door opens. It’s like a surprise party every time I go into the office (Okay I stole that from Jerry Seinfeld). For this post I will do a step by step guide.

For this guide we will start from the Configuration Menu. Just an FYI there are in fact multiple ways to setup an automation with this new version of HASSIO. The way we are going to proceed is the classic way of setting it up which is Configuration Menu > Automation. However if you are the devices menu looking at a device you will actually see all the automations attached to that device. This is an awesome feature I am so excited that it is available.

Anyway, on to the guide.

From the configuration menu click Automation

On the Automation page you will be shown a mostly blank page, with a little plus icon in the lower right hand corner. Click on the icon and proceed to the to setup wizard.

Home Assistant New Rule Button
New Rule Button

Once you click on the new rule button, it launched the new Automation Wizard

New Automation Wizard

From here you can follow the wizard and type in what the automation should do and then click Create Automation and it will walk through the process of creating the wizard, or you can be like me and kick it old school and just click SKIP.

You will then be presented with the blank automation form

Blank Automation Form

Now you will need to name your new Automation in my case I named mine Office Lights Turn On. From there you will need to move onto the Triggers section.

Specify the Device, in our case it is Door/Window Sensor and then what the triggering status would be. Then move down to Actions.

Here we will specify the device which in our case is my GE in Wall light switch and the action which will be to turn it in.

Once you are done with all the configs you will need to click the Save icon in the lower right hand corner (you might need to go looking for it).

To recap the rule we just setup will set the in wall switch to ON when the door sensor is set to on. It is really that simple, and it makes your friend and family think that you are a wizard…. well maybe not but it’s still cool.

I hope you found this guide helpful and if you did please share with your friends.

Categories
Home Assistant Home Automation Z Wave

Home Assistant / HASSOS 2020 Build out

With all that has been going on in the world I decided with all my extra free time to get back into my Home Assistant setup and do some updates. There had been many changes and updates since the last time I looked at my system and let me tell you right off the bat, my system was running great. It had been up for about a year or so since the last catastrophic failure, which in my defense was due to my SD card becoming no longer readable. Before that my Home Assistant (that’s right not HASS.io) ran for like 3 years before this happened.

So I logged into my HASS.io setup and decided to start updating…. and that is where things went wrong. I tried to install OpenZWave which caused my zStick to stop working and my APIs for my smart thermostat and IKEA TRADFRI stopped working as well.

Needless to say I had to start from scratch so I downloaded the latest version of HASS.io and turned off my Raspberry Pi. Here is what I am working with for this setup:

  • Raspberry Pi 3 B+
  • 128 GB San Disk SD Card
  • Aeotec Z-Stick Gen 5

I loaded up my setup and fired up the Pi….. then I realized I forgot to configure my static networking for HASS.io. Fiddle sticks, So I hit the power button on my USB Dongle, popped the SD card back in my PC and made the Network changes (I can create a walk through for this later, or you can RTFM on the Home Assistant Website. Then I replaced the SD card again and fired up the Pi, and after 3 hours, nada. It didn’t work. ARGH!!!!

Apparently HASSOS (the OS for HASS.io) does not like it when you pull the power out while it is attempting to download files and databases. Go figure.

So I powered off the Pi and flashed the Card again and we were off to the races. FYI, I didn’t do the network config file this time either and it worked fine…. Thanks DHCP!

Once I got to the log in screen my first order of business was to get Open Z Wave running. I went to the Supervisor section of Home Assistant and added the Open Z Wave Add-on. What I didn’t realize was the fact that I needed to install MQTT before Turning on the Open Z Wave service. I can go into details on that in a later post as well but for now just know 2 things. First, once you turn on Open Z Wave for the first time it may take 2 or 3 tries for it to actually start and stay started. Even then it will take about 2 minutes for the service to load (depending on your hard ware). 2. Even if you click start on boot, it does not start on boot.

After all of that I finally got it to load as seen here:

Open Z Wave Dashboard

If I can give any first timers or even those who are used to the older Z Wave Interface any advice, it would be to be patient. It took about 12 hours for all of my Z Wave devices to finally report in.

Currently my Z Wave Devices are as follows

  • GE Z Wave Smart Switch (Gen 1)
  • Zooz Motion Sensor
  • Zooz 4 in 1 Sensor
  • Z Wave Door Sensor
  • Wave Door Sensor
  • GE Z Wave Smart Switch (Gen 2) (Not installed yet)

I am going to end this post here, but I plan to document my build out of Home Assistant and maybe even my VMware Home Lab where I might start to run Home Assistant on a VM!.

Categories
Home Assistant Home Automation Z Wave

Home Automation…. reinventing the wheel

A few months back I had a catastrophic failure with the Raspberry Pi that had been running my Home Automation Platform (Home Assistant). Long Story short, I reached the physical limit of writes available on an SD Card. Who knew you could reach that limit on less than 2 years if you are running an a Home Automation System, Logging Location Services, Temperature monitoring, well as an MQTT Broker on the same box?? 

Unfortunately my schedule did not allow for me to rebuild my Raspberry Pi sooner, and I am kind of glad that it did. During the time of being Home Assistant-less, I learned that I was really not using it to it’s fullest extent and that overtime most of the features that I depended on it for had been transitioned over to my Google Home/Smart Things Hub, or my kids ended up reprogramming (more on this later).
I started to think about what I really needed Home Assistant for, well besides turning on my Z Wave Controlled office lights for me (that was very handy). I also thought about how my Google Homes had been taking over my life. Then it occurred to me. 90% of what I use my Google Homes for is Voice controlling my lights. That is not Automation, 4 times out of 10 I have to repeat myself to get it to work, and the effort of turning on a light switch with my hand is not very taxing. 
Really, I am just being lazy….. End of Story!
Just kidding….
In all seriousness I decided to get back to basics and figure out what I had going on in my house that could use Automating and here is a list of projects I have come up with that I will do blog posts about in the future.
  • Install Philips Hue Lights (the wife bought me these about a year ago, Time I put them to work)
  • Automating Dehumidifier – using a Z Wave humidity sensor and a WEMO Outlet
  • Automating Basement Space Heater – Same concept as above
  • Automating Office Fan – Now this one is going to be tricky. I am not sure if I want it to turn on when I open the door, or at a certain temperature. 
  • Automating my Bearded Dragon’s Lights – Using a WiFi Enabled power strip
  • Automating Exterior lights – Using Presence of all family members and time of day
I have other lists of things that I would like to do down the road, but for now, this should keep me busy. 
Just so you are aware, I do have vanilla Home Assistant running on my Raspberry Pi 3 B+ and I am still trying to figure out what I am going to do about an MQTT Broker to communicate with my Smart Things Hub. I have been playing around with Docker and I am thinking that is a good place for it to live, as well as hosting it on a separate Pi or Linux machine. 
Come September my schedule will be going back to crazy, if not worse with some additional things I am putting on my plate which I hope to talk about soon.
Categories
Home Automation Z Wave

Home Automation Platform Discussion Continued……

In my previous post I spoke about the shut down of the Lowe’s IRIS Home Automation Platform. I went into great detail about several of the Open Source options that exist out there such as:

Home Assistant
HomeGenie
openHAB

I also made mention to there being paid Home Automation Systems that are available that do not require a subscription. But I did not make mention of them in my last post. I would like to take this opportunity to list some of the (in my opinion) more popular ones.

Depending on which one you plan on going with, you might be locked into a particular type of hardware or protocol, in other cases the platform might me more Open.

Google Home/Alexa – I mostly have experience dealing with the Google Home line of products, however I do have some experience with writing Alexa skills. I can say for sure that Google Home is compatible with a wide variety of products and services including some open source ones like Home Assistant.

Smartthings – Samsung is another one of those platforms that will accept different pieces of hardware. However I am pretty sure that you are locked into using the Zigbee protocol. Oddly enough, if you sign up for their developer portal, you can reprogram IKEA TRADFRI lights to work with it as seen in this Blog post I did years ago.

Philips Hue – I believe they only deal with lights, many different kinds of lights. From Bulbs, to LED Strips, to Wireless LED bulbs. Within their app you can set different Profiles or scenes for each device so you an set the mood.

Ikea Tradfri – I would call this one the poor man’s Hue. That does not mean that this product is any worse that the Hue, but I will say that the lights are cheaper, like $12 a bulb vs $20 a bulb for the hue. Like I said above, the TRADFRI operates using the Zigbee Protocol, so you can reprogram them to work with a Smartthings Hub if you follow the guides.

What I like the most about all of the hubs that I listed above is that they all can integrate with Home Assistant which is by far my favorite home automation platform. The downside is I now have 4 or more hubs running on my home network, but that is my problem.

I hope you guys found this article helpful and if so please share.

If you are interested in purchasing anything covered in this post, feel free to check out some of these links below.

Alexa: https://amzn.to/2CpgDiK

Hue: https://amzn.to/2CqcpHt

Smartthings: https://amzn.to/2HDzmKW

Raspberry Pi: https://amzn.to/2CjoMVV

Categories
Home Automation Z Wave

Lowe’s to shut down IRIS Home Automation Platform…..

A few weeks ago I saw this Article about Lowe’s Home Improvement Store shutting down it’s own proprietary home automation system. Here is the article if you wish to read it:

https://www-techhive-com.cdn.ampproject.org/v/s/www.techhive.com/article/3337249/hubs-controllers/lowes-will-shut-down-its-iris-by-lowes-smart-home-platform.amp.html?amp_js_v=0.1#referrer=https%3A%2F%2Fwww.google.com&amp_tf=From%20%251%24s&ampshare=https%3A%2F%2Fwww.techhive.com%2Farticle%2F3337249%2Fhubs-controllers%2Flowes-will-shut-down-its-iris-by-lowes-smart-home-platform.html

I have never used this system before, but my very first Home Automation System was a Nexia Home System. I thought it was awesome, until I realized it was a pay service, and I needed to use their hardware which was very hard to find.

The purpose of this post is not to mark the death of another proprietary home automation platform, but to bring awareness to some of the open platforms like Home Assistant, OpenHab, and others.

There ares several issues with these proprietary systems such as:

Locked into hardware – You have to use a set hardware list provided by the hub supplier. This limits you on what hardware you can use, and where you can procure it. Also non-branded hardware might not be supported by your hub.

Large up front costs – Just to get into the Home Automation game you not only need to pay for the “Smart” Hardware, but you will also need to pay for the Smart Hub, or Gateway.

Subscription Cost – You are required to purchase a subscription to use your home automation system. If you do not pay, your services will be terminated.

Locked into protocol – Each proprietary hub uses their own protocol. It could be ZWave, ZIGBEE, WiFi, or something else entirely. But either way you only get to use one.

Security – Instead of all events being handled on the local HUB (sometimes called a Gateway) all functions are handled in the “Cloud”. This means not only do you need an internet connection, but you are relying on the vendor for the security of your data, and your home.

Once you realize this you are going to think, is it even worth it to look into Home Automation?? Why should I do this when the cost is so much??

Well I am here to help show you another way. You see there are several open source options out there as well as non-subscription based Smart Home Solutions available to you.

Open Source Solutions

The benefits of Open Source Solutions include the following:

Open Hardware – You are not locked into specific hardware, which means that you can get your hardware from anywhere.

Low upfront cost – Most if not all Open Source Solutions can run their software on cheap/low cost hardware such as a Raspberry Pi.

Open Protocols – Most if not all Open Source Solutions support any protocol, if not multiple protocols at the same time.

Security – As the hub is running in your house, it is not necessary to connect it to a cloud service (but you can if you want) so you can prevent your system from being accessed from the internet if you want to.

Below is a list of Open Source solutions that I would recommend looking into:

OpenHab – I do not have much experience with Open Hab, but like most Open Source Home Automation Solutions, you can run the Hub software on a Raspberry Pi.

Home Genie – This was the first Home Automation Solution that I used. It was very easy to administer, but I found it limiting with what I could do. Now it has been several years since I looked at it, so I would suggest checking it out again. This one also can run on a Raspberry Pi.

Home Assistant – This is the Solution that I am currently using, and I have to say I love it. I have not found a limitation with the system, except for my SD card running out (but that was my Error). It is super simple to setup and even has a cloud connector is you want to be able to connect to cloud services like Alexa or Google Home.

I hope you found this guide helpful, please share with your friends.

If you are interested in purchasing anything mentioned in this post, please feel free to check it out in the links below.

Raspberry Pi: https://amzn.to/2CjoMVV

Nexia Home Automation: https://amzn.to/2FiEm5T