Categories
Virtualization Vmware

How to add a VM to inventory

So like I mentioned in a previous post, I have been trying to help people out on VMNT or VMware Community forums. One of the posts that I helped out on involved someone who needed  help adding a VM to inventory after it was restored.

Here is how you can add a VM into inventory if it has been removed for some reason

From vCenter, you will need to click on a ESXi hosts
Then click on the Configure tab

Then click on Datastores and select the Datastore that the VM is stored on. 
Right Click the Datastore and select Browse Files

Locate the VM folder, and select the .VMX file

Right Click on the .VMX file ans select Register VM

This will open the Register Virtual Machine wizard. You will need to set the name (which should be pre-populated and select the Data center and click Next.

Select the Cluster and click Next

Select the Application Pool and Click Next

Click Finish to exit the Wizard

 
After you exit the Wizard you will see the Virtual Machine added to Inventory. 
As always I hope that this is helpful for someone. 

RVTools – A VMware Admin’s best friend

Today I would like to talk about one of my favorite tools that I use both internally and with my clients.

RVTools – https://www.robware.net/rvtools/

RVTools is a free utility that you can use to discover what is going on with your VMware Environment. All you have to do it install the client on your machine and in a few minutes you are able to log into your vSphere Environment (using your normal vSphere Credentials) and it will give you a read out of your entire environment.

From the login Screen the look and feel is very reminiscent of the old C# vSphere Client used back in 5.x and 6.0 days.

Once you log in you are presented with the vInfo tab which is a summary of everything going on with the vSphere/ESXi host you Connected to.

Along the top you will see a series to tabs that will drill down into the various components of your environment such as the ones seen below

I am only going to cover a few of these features, but I encourage you to try it out for your self.

 vCD will show you what Virtual Machine has a CD Drive installed on it, if it is connected, and what .ISO is currently connected to it. So ,.for instance, if you have a Virtual Machine that will not vMotion, you could use this tool to see if it is attached to a .ISO that is on Local Storage.

vSnapshot will show you all the Virtual Machines that have snapshots associated with it. It will report back to you the name of the Virtual Machine, the name of the Snapshot, the Date/Time it was taken, and the File Name of the snapshot.

And Lastly we will touch on the vHealth tab. This tab will give you advice on things that you may not realize is going on in your environment such as inconsistent naming, Host logs not being stored on persistent storage, VMware tools being out of date, and Zombies (Files that exist on Datastores, but are not in inventory).

On a final note that I forgot to mention, If you go up into the file menu you are able to export everything you see in the tool to a .CSV which can become very handy for documenting your environment. 
I hope you find this post useful and if you do download this product, please consider donating to it’s creator. Without tools like this it would make all of our jobs much harder. 

How to Change VM from BIOS to UEFI

I just had a question on the VMWare Community about how to change a VM from BIOS to UEFI.

I found that if you go into Edit Settings > Click on the VM Options Tab and you should see this

I hope this is helpful for anyone who needs this information in the future. 

TCP Reverse Proxies, the next step in web hosting

So as I mentioned previously, I have been dealing with a DR issue at work. One of the services that we did not bring back due to networking issues is our IIS ARR server which was acting as a reverse proxy for several of our web services.

So there are many options out there which we can go with so but I would say that the front runners at this time are either NGINX or PFSense. Over the next few days I will go into more details with additional posts with more information.

How to add Target Servers to vMA

I have had this one post sitting around for a while and I figured I should get it written before it gets lost.

Earlier I was working on getting vMA stood up in my lab environment and I figured that I should do a post about how to configure vMA to connect to a target. Adding a Target Server in vMA is a faster way for you to be able to issue commands. Rather than having to specify which server you want to run commands against (especially if you are running several commands on the same box) you should set the server as a target. In this instance I will run through the steps of setting a target for an AD Authenticated host or vCenter. 

From the vMA console you will type the following command out:

vifp addserver <vcenter server name.domain.local> –authpolicy adauth –username <AD DOMAINUserName>

and press Enter and you will be prompted for the Password of the AD account that you referenced.

To verify that the server is connected you can use the following command:
vifp listservers –long

This will tell you the server name as well as the method of authentication. Now anytime you want to run a command against that host you will be able to do so without having to re-authenticate every time.

To set your Target server you can use the following command prior to running your actual command or script.

vifptarget -s <servername>

VMWare Virtual Machine will not Start in vCenter

So I was asked by a client to do up “hardware upgrades” on one of their virtual machines. This VM is not production and is not running anything at the moment, but will soon become an SQL Server running an application. So I went and powered off the VM, logged into the C# vSphere client (they are running vSphere 6.0), and doubled the memory as requested by the client.

After making the change I went to power on the VM and I get presented with this pop up error message from VMWare

The message itself seems pretty generic but I have actually seen this one before. This error has to do with  an issue with the management agents on  your ESXi host.

I followed the instructions found on this KB article but it did not resolve my issue. I also found this KB article which might yield better results but as this whole environment is production, I will need to wait to test that.

WORK AROUND:

In order to get this VM powered back online, I needed to log directly into the virtual host and power on the machine.

The VM powered on with no issues.

I hope you find this helpful and I will update this when I have a solution.

how to build server 2012 r2

Continuing on from my previous post on how to build a VM using the VMWare vSphere C# Client and How to Edit a VM, I figured I would use that as a segway into our next subject and take that same VM that we build and install Windows Server 2012 R2.
Now taking that same VM right click on it’s name on the left hand panel and click open console (this is a matter of preference but there any many ways to do this). Once the virtual machine console is open click on the green play button to start the VM.
Now if you follow the aforementioned posts then you should already have the .ISO with Windows Server 2012 R2 already mounted and you should be presented with the screen below. 

Select your language of choice and click next, and click install now on the next screen.
On this next screen you can select what version of Windows Server 2012 R2 you would like to install. Your options are:
  • Windows Server 2012 R2 Standard (Server Core Installation) – This is command line only and not recommended unless you know what you are doing.
  • Windows Server 2012 R2 Standard (Server with a GUI) – Great for beginners and general purpose uses.
  • Windows Server 2012 R2 Datacenter (Server Core Installation) – Same as above for Standard, however this is designed to handle larger workloads and virtualization (Hyper-V)
  • Windows Server 2012 R2 Datacenter (Server with a GUI) – designed to handle larger workloads and virtualization (Hyper-V)
For our purposes we are going to use Server 2012 R2 Standard as the end result will require us to have a GUI. Click Next

Accept the License Terms and click Next. 

On the next screen you will be given the option to upgrade your current version of Windows Server or to do a custom install. Since this is a brand new virtual machine we will need to click Custom.

You are now asked which drive to install Windows, I have selected the 60 GB drive and then click “New”. This will allow you to format the drive as right now both drives are Unallocated.

You are now given the option to size your partition, I went with the Maximum for the drive and click apply.

In standard Microsoft fashion you will get a dialog box asking if you want to really do this as it will destroy everything currently on the disk. Click OK to continue.

You will now see that Drive 0 has 2 partitions, The System Reserve  and Partition 2. (We may go into this in greater detail later) To keep my drive lettering from getting out of control, I am now taking the time to format the 2nd Drive. This is just a simple housekeeping step, you can skip it if you would like but just remember you will need to format this drive sooner or later. 

After the formatting is completed, I select Drive 0 Partition 2 to install Windows and Click Next.

Now the installation process has begun.

Once this has completed you will need to go through the startup menu which will ask for Product License, and Administrator Password. Once all of that is completed you will then be able to log in and configure your machine. 
That is all for now, I will continue to update this post with more screenshots and continue the series. 

How to edit a VM hardware after it has been created

So after you go and make your Virtual Machine you realize you forgot to mount the .ISO for Windows Server 2012 and you left the Floppy Drive in the config which is not really hurting anyone but it makes things more aesthetically pleasing to not see it there.  So what do you do….
Here are the detailed steps to change the hardware configuration of a virtual machine from the VMware vSphere Client.
With the virtual machine selected in the navigation pane you should see the “Getting Started” tab in the center panel. On that tab towards the bottom you will see the “Basic Tasks” section as seen in the screenshot below. 

Click on “Edit Virtual Machine Settings” and the Virtual Machine Properties Window will open up for you.

From here you can see all of the virtual hardware that is assigned to the virtual machine in question. You can also make changes to the virtual hardware as you see fit.

Please note: you will not be able to modify all of the settings if the VM is powered on. Some things like Memory and CPU will require the VM to be off before VMware will let you modify it.

To remove the Floppy drive select the device by clicking on it and click the remove button.

You will now see that the device has a line though it, meaning that this is a pending change for removal and will not take effect until you click okay at the bottom. 
To add the boot ISO you will need to click on the CD/DVD Drive to highlight it.

To add an ISO stored on a Datastore like a LUN or the Local Datastore on the virtual host click Datastore ISO file radio button.

Once you click on the radio button the browse button then becomes available to you. Click on the Browse button to open the Browse Data store window. 

Navigate to where you ISO is stored and click Open.

The file path for the ISO is now populated for you. I suggest that you click connect at power on up at the top of the window. This will make sure that the CD drive presents the ISO to the VM at boot up and allows you to boot into the VM. 
Click okay to close the window and to commit the changes. Once the tasks have been committed you will then be able to power the VM back on. 

VM not Powering on due to vmx.lck

To start, let me apologize for not taking screen shots to share this issue. If this issue occurs in the future I will be sure to take them then and fill in the blanks.

Today after coming into the office from a long weekend because of Memorial Day we discovered that our Lab had an issue on Friday at 7 PM. While I was working on getting everything backup and online I found that my precision Exchange 2013 Server that I built in a previous post was showing up as being grayed out.

Play ominous music

My knee jerk reaction here was to remove the VM from inventory and try to re-add the VM back into inventory by right clicking on the .vmx file and click add to inventory. Something I have done hundreds of times before without issue. However this time was different, the .VMX file would not allow me to add the VM to Inventory. I also noticed there were more than 1. VMX file.

Fortunetly I was already logged into the host as root and saw the the VM was still in inventory. Then I looked at the other host while logged in as root and saw the same thing. I then processed to look at the vCenter and I did not see the VM anywhere.  I thought to myself now how can this be? I am not 100 % of what exactly happened for sure but I have a theory that I intend to try and duplicate at a later date.

So here is goes:

The entire environment went offline during a network issue that caused the iSCSI to drop out. We have had this issue before and after checking the NAS we discovered that the NAS is okay we initiated a reboot of the virtual hosts. Once they came back online we found that the storage adapters could not see the NAS. So from here we rebooted the NAS and we were then able to do a rescan and the LUNs all came back without issue.

Now because we have HA and DRS enabled on our cluster the VMs all started on their own, causing a whole new headache that I do not want to go into at this point. However during this process the one host evacuated all it’s VMs and sent it to the other host.

I am thinking that this is the point where the VM mix up occurred. the 2 virtual hosts were fighting for the VM and that contention caused it to become orphaned. To resolve this issue I removed the VM from the inventory on both machines and then the vmx.lck file disappeared and I was able to re-add the VM back into inventory though vCenter.

I hope this helps someone with their issue, sorry for the lack of pictures but if/when it happens again I will be sure to add it back in.

How to create a new VM using VMware vSphere 5.x

Greetings all, this will be my very first technical blog post. I am pretty new to the game but I figured that starting with a how to guide may be beneficial to others as well as a great way to track all of the things I have worked on.

In this post I will go over the process of creating a new Virtual Machine (VM) in with VMware vSphere 5.5 in my lab environment. I will be doing this in a series with the end goal of having Microsoft Exchange 2013 SP1 installed and running in my Lab environment.

Things to consider before proceeding is that this is a preexisting lab environment that has a lot of things going on. Now what we are working on here should not be disruptive to the rest of the ecosystem but you never know. the moral of the story here is to make sure that you are mindful of what you are working on and do not touch what is not yours.

Now with that out of the way, lets get started:

Requirements
Build 1 VM with the following specs:
CPU: 1 Socket 2Cores
RAM: 8 GB
HDD: OS 60 GB and Data 80GB

Note – I know that these spec’s are not recommended by Microsoft to run a production Exchange server. Remember that this is a Lab, If you are using this as a guide for Production then I recommend that you check the system requirements from Microsoft

https://technet.microsoft.com/en-us/library/aa996719%28v=exchg.150%29.aspx

Step 1 – Log into vCenter using the vSphere client

Fill in the IP/Name of your vCenter Server/ESXi host,username (in my case DomainUsername), and password

Once logged in click on the Virtual Host that you want to create the VM on and click create VM on the Getting Started Tab under the Basic Tasks section.

This will launch the create a New Virtual Machine Wizard.

Click Next to continue to the Configuration Screen
From here you have the option to select Typical or Custom configuration. For the purpose of this guide we are going to click Custom to give us the options that we need that are not available under typical.
Once you click Custom you will see the menu tree on the left hand side expand out. Click next to continue.
On the Name and Location is where you can name your VM. You can name it whatever you would like, it does not have to be the name of the computer but believe me when I say that is does help. 
Click Next to proceed

After the Computer is named you may be asked to specify the resource pool you would like to have the VM in. We will talk about resource pools at a later date. Unless you know what you are doing, just leave the defaults and click Next.

You will now be able to select what Storage you would like to use for your VM. My suggestion is to pick some kind of shared storage solution (NAS/SAN) but if that is not available then Local storage will work. Just make sure that you have sufficient space for your VM.

Click Next to Continue.

 On the Virtual Machine Version Window you will be able to select what hardware version you would like the VM to be. This will be important if you are running different version of ESXi in your environment and you plan to use vMotion to migrate machines. For the purpose of this exercise and because all of my ESXi hosts are at least version 5.5 I will select Virtual Machine Version 8.

Click Next to continue.

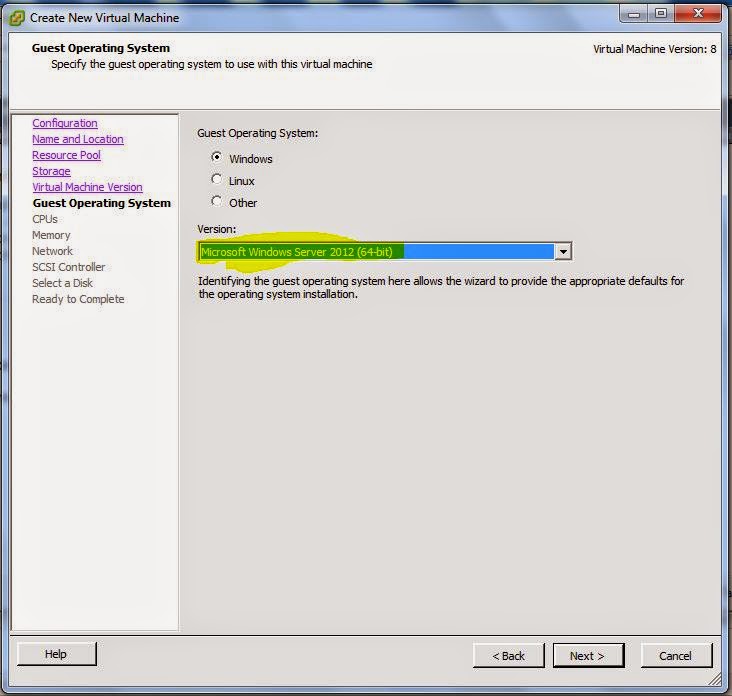
Guest Operating System allows you to select what OS you are going to install on your VM. This comes in handy as VMware has pre-configured options based on the OS you are installing on the VM.

Since we are installing Exchange 2013 I thought it would be nice to install Server 2012 as the base OS.

Click Next to continue.

On the CPUs section allows you to select the number of Sockets and Cores that you would like to use and because we are installing Exchange we would need to allow more cores to be available to this VM. The default is 1 Socket and 1 Core but for my purposes I set the cores value to 2 for this case.

Click Next to continue.

Memory Configuration is exactly what it sounds like. You are able to specify the amount of memory for this VM, the Default is 4 GB and I have changed it to 8 GB for now.

Network not only allows you to define the number of network adapters your VM will have but what network you are putting it on and what adapter you would like to use.

The default is to have 1 NIC and I am going to leave it the same for this, and the default adapter is the Intel E1000. I have changed it to VMXNET3, however if you use this NIC you will need to install VMware tools for it to work. For more information for your network choices you can read the KB Article here

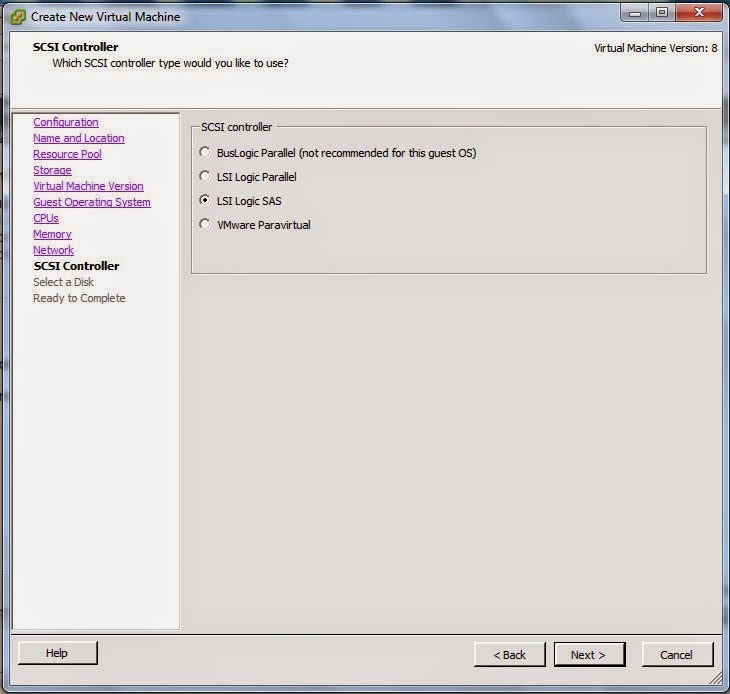
Click Next to continue onto SCSI Controller.

The next option that you get to set is the SCSI Controller, By default LSI Logic SAS is selected. Depending on the OS and other factors you may wish to change this however I will leave the default.

Click Next

 You are given a few option for creating a new disk for your VM. 99% of the time I would say that “Create a new virtual disk” will be the only option you will use. However there are a few time where you may want to map your new VM to a preexisting disk (VMDK) or a Raw Device Mapping (RDM).

Click Next to continue.

Now that you have selected a disk it is now time to create it (Format) how you would like it.
For our purposed I have made the disk Size 60 GB and I plan on using this for the OS only. I have also chosen to “Thin Provision” this VM, this will allow for faster creation time, however there may be a performance impact during disk operation as the disk will be provisioned as the data is being written. This is perfect for my lab environment. You will need to figure out what will work best for you and you needs.

Click Next to to continue.

Since we are using a SCSI controller we have the option of changing the address of the disk and even specifying what mode we would prefer.

Virtual Device Node can be left a default as vCenter does a decent job of handling this for us.

Mode – if you are intending on using vCenter to Snapshot your vm you can just click Next as I have to move past this.

Click Next

Right before you VM is created you have the Option to Review all of your choices before you click Finish.

 As you will notice there is a check box that will allow you to edit the virtual machine before it is created. This is great to use if you need to add an additional Disk or you would like to mount an ISO of your preferred OS before making you VM.

Click Finish and your task will be submitted.

Once the Task is completed the VM should be created and be ready to start.

Well that is all for now, I hope to see you all on my next post for Installing Windows 2012 R2.