Categories
Virtualization Vmware

How to convert VMDK from Thick to Thin Provision

As I have stated in a previous post, I have been trying to help out on the VMware Community Forum. One of the threads that I was able to help out on was how to convert a VMDK from thick to thin.

I have had the opportunity to do this several times in the past, but I have never needed to document. I was able to do a step by step procedure from memory for the thread, but I figured doing an actual guide might be helpful to someone else. 
The first thing that you need to realize is that the VM you want to change from Thick Provision to Thin MUST be powered off before you can convert it. 
Launch the VMware vCenter Converter Standalone Client software.
Click on the Convert Machine button.

That will launch the Converter wizard

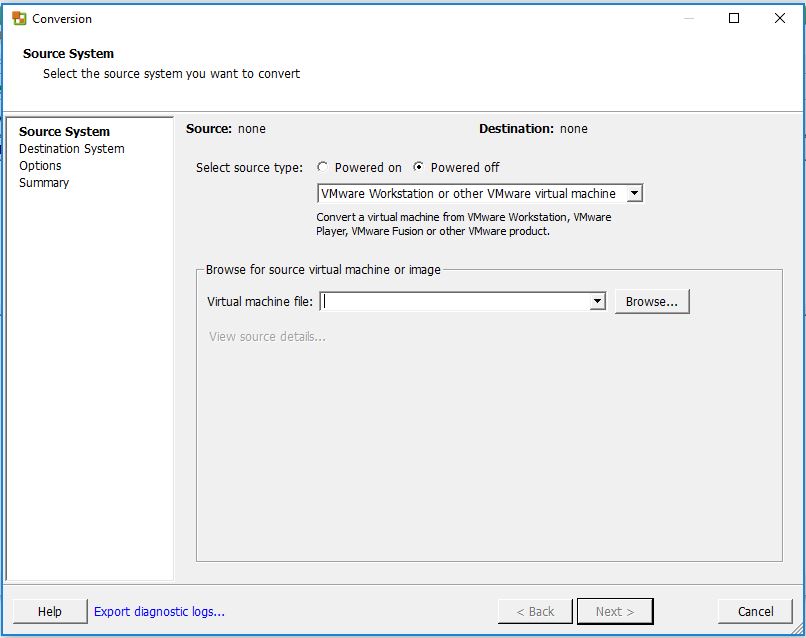
By Default  the Source machine will be set to Powered on VM. You will need to select the Powered off radio button which will give you to option to select VMware Virtual Machine. 
Enter the Server Name or IP address, Username, and Password for the Source system and click Next

This will cause the Wizard to do a check against the Source machine to make sure that the credentials are able to access the vCenter server. 

Once you are logged in, will see the your vCenter server and ESXi hosts. Click on the vCenter server, or ESXi Host to see all the VMs that are available. 

Select the Powered off VM you wish to convert to thin provisioned and click Next. 

Next you will need to enter the Server Name, User name and Password for the destination host. Before you ask, yes the source and destination host can be the same server, however the Virtual Machine name will need to be different. 
Click Next to Continue

As I mentioned above, you will need to give the Virtual Machine a unique name, otherwise vCenter gets pretty mad. 
Select the Data Center you would like to put the VM on and click Next. 

Select the Host, Datastore, Virtual Hardware Version, and click Next.
NOTE: You should probably pick a different datastore that the one you used before, just to make sure that you don’t run out of space. 

This will take you to the Options screen which is where you are allowed to change the Virtual Disk from Thick to Thin. 

Click Edit as seen in the screen below.

This will bring up the disk configuration for this Virtual Machine.

Click on the drop down under Type and change it from Thick to Thin and then click Next.

You will then be presented with the Summary screen which you can review, and then click Finish to start the conversion. 

 As you can see the Job gets submitted and will run until it completes successfully

Once it completes you will see in vCenter that there is a new Virtual Machine and if you check the settings of that Virtual Machine the VMDK will be Thin Provisioned. 
Thank you for stopping by, and I hope you found this post helpful and please check back later for more updates. 

Scenario 004 – Issue with connecting to NETAPP OnCommand System Manager

It has been a while since I did one of these posts do I figured I would try to get back to it. 
Today I was working at a client site and I had to make some changes to one of their VMs to increase storage. While working on their management host I attempted to connect to their NetApp OnCommand System Manager when I was presented with this:

Having seen this so many times I figured I would share the solution. The error message above is telling you that the file SystemManager.ks is corrupt. This file can be renamed and is located here:

C:Users<username>NetAppSystemManager

Once you rename the file all you have to do it close you IE window and try again.

How to edit a VM hardware after it has been created

So after you go and make your Virtual Machine you realize you forgot to mount the .ISO for Windows Server 2012 and you left the Floppy Drive in the config which is not really hurting anyone but it makes things more aesthetically pleasing to not see it there.  So what do you do….
Here are the detailed steps to change the hardware configuration of a virtual machine from the VMware vSphere Client.
With the virtual machine selected in the navigation pane you should see the “Getting Started” tab in the center panel. On that tab towards the bottom you will see the “Basic Tasks” section as seen in the screenshot below. 

Click on “Edit Virtual Machine Settings” and the Virtual Machine Properties Window will open up for you.

From here you can see all of the virtual hardware that is assigned to the virtual machine in question. You can also make changes to the virtual hardware as you see fit.

Please note: you will not be able to modify all of the settings if the VM is powered on. Some things like Memory and CPU will require the VM to be off before VMware will let you modify it.

To remove the Floppy drive select the device by clicking on it and click the remove button.

You will now see that the device has a line though it, meaning that this is a pending change for removal and will not take effect until you click okay at the bottom. 
To add the boot ISO you will need to click on the CD/DVD Drive to highlight it.

To add an ISO stored on a Datastore like a LUN or the Local Datastore on the virtual host click Datastore ISO file radio button.

Once you click on the radio button the browse button then becomes available to you. Click on the Browse button to open the Browse Data store window. 

Navigate to where you ISO is stored and click Open.

The file path for the ISO is now populated for you. I suggest that you click connect at power on up at the top of the window. This will make sure that the CD drive presents the ISO to the VM at boot up and allows you to boot into the VM. 
Click okay to close the window and to commit the changes. Once the tasks have been committed you will then be able to power the VM back on.